Drilling a hole might look easy, but honestly, it’s one of those spots where woodworking can fall apart fast. The right drill bit and a steady hand give you clean, neat holes, but the wrong bit can split your wood or wreck hours of effort. Whether you’re fixing a wobbly chair or building a fancy cabinet, this skill is pretty much non-negotiable.
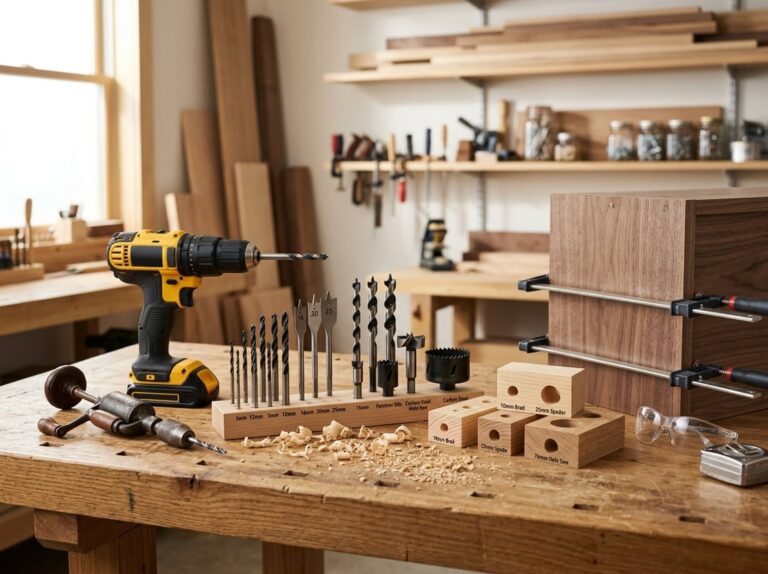
You really don’t need every drill bit under the sun to get good results. What matters is knowing which types do what. Brad-point bits make crisp entry holes for hinges and hardware. Twist bits are solid for end grain and small holes. Forstner bits? They make those nice flat-bottomed holes you need for hidden joints.
This guide covers the drill bits that actually matter for woodworking. You’ll figure out how to drill straight, clamp your work without fuss, and avoid ugly tear-out. There’s also a bit about safety and keeping your bits sharp, so your projects end up looking sharp too.
Choose the Right Drill and Bit Setup
Picking out the right drill and bit combo depends on your project, what you’re cutting, and how big the hole needs to be. Your choice of tool, chuck size, shank style, and speed all play a part in getting clean, accurate holes.
Cordless Drill, Hand Drill, and Drill Press Uses
The cordless drill is the go-to for most woodworking stuff. It’s great for pilot holes, driving screws, and those awkward spots where a stationary tool just won’t fit.
Hand drills might seem old-school, but they’re perfect for small, delicate holes where you want to control speed and pressure, like when you’re working with thin veneer or fragile joints.
Drill presses are the accuracy kings. They hold the bit steady, so your holes come out straight. Use them for:
- Making a bunch of holes that need to match up
- Drilling deep holes that have to stay straight
- Joinery work where precision is everything
If you’re dealing with tough hardwood or need extra muscle, an impact drill or hammer drill can help. They’re not really for fine woodworking, but they come in handy for rough jobs or drilling into something stubborn.
Drill Chuck Capacity and Bit Compatibility
The chuck is what holds your bit, and its size decides what bits you can use. Most cordless drills have a 3/8-inch or 1/2-inch chuck.
With a 3/8-inch chuck, you’re set for smaller bits, which covers most pilot holes and light joinery. A 1/2-inch chuck lets you use bigger Forstner bits or spade bits for larger holes.
Always check your chuck size before picking up a drill bit set. Some sets have bits with shanks that are just too big for smaller chucks, so you might not be able to use every bit.
Drill Bit Shank Types: Straight, Hex, SDS+, and SDS Max
The shank is the part that goes into the chuck. Different shanks fit different tools and offer different grip and power.
Straight shank bits are the standard for woodworking. They fit any regular three-jaw chuck and do fine with wood and light metal.
Hex shank bits have flat sides that stop them from spinning in the chuck. Super handy for driver bits and quick-swap chucks since you can switch bits fast.
SDS+ and SDS Max shanks are for hammer drills, not your average woodworking drill. They lock in without a chuck and give you more grip for concrete or masonry. Not something you’ll need for most wood projects, but good to know if you ever end up drilling into a wall or brick.
Matching Bit Size, Hole Depth, and Drill Speed
Pick a bit that matches the hole you need, whether it’s for a screw, a dowel, or hardware. Too big or too small, and you risk splitting the wood or weakening the joint.
For deep holes, drill in short bursts and pull the bit out now and then to clear chips and keep it from overheating.
Adjust your drill speed (measured in RPM) based on bit size and material. Here’s a quick cheat sheet:
| Bit Size | Recommended RPM |
|---|---|
| Small bits (1/16″ – 1/4″) | 1,500–3,000 RPM |
| Medium bits (1/4″ – 1/2″) | 750–1,500 RPM |
| Large bits (1/2″ and up) | 250–750 RPM |
Go slow for big bits, and crank up the speed for tiny, precise holes.
Know the Anatomy and Materials of a Drill Bit
A drill bit’s got a few important parts that work together to make clean holes in wood. Understanding these helps you pick the right bit and drill with more confidence.
Points, Spurs, Cutting Edges, and Flutes
The point is the tip. It starts the hole and keeps the bit from skating around.
A spur is a sharp edge you’ll see on some bits, like brad-points. It scores the wood before the bit cuts, so your hole starts right where you want it.
The cutting edge does the slicing as the bit spins.
Flutes are the spiral grooves that run up the bit. They carry the wood chips out of the hole so things don’t get jammed up. Here’s the rundown:
- Point: Starts and centers the hole
- Spur: Scores for cleaner edges
- Cutting edge: Slices the wood
- Flutes: Move chips out
How Shanks Hold Bits Securely
The shank is the top part that fits in your drill’s chuck. Usually it’s smooth and round, but sometimes you’ll see hex shapes for extra grip.
A snug fit between shank and chuck is a big deal. If the shank slips, you’ll get wobble or uneven spinning, and that’s how you end up with rough or off-center holes.
Always tighten the chuck well before you start drilling. Give it a quick check after drilling for a few seconds, since bits can loosen up as they warm up.
High-Speed Steel and Other Bit Materials
High-speed steel (HSS) is the workhorse material for a standard drill bit. HSS handles heat and keeps its edge through lots of use, so it’s a solid, budget-friendly choice for most wood drilling.
There’s also carbon steel, which is softer and only really good for basic wood jobs. Titanium-coated bits add a hard shell to HSS, making them last longer.
Carbide-tipped bits are pricier but stay sharp way longer than HSS. They shine on tough materials, but honestly, HSS does the job for typical woodworking.
Why Wood Fibers and Chip Removal Matter
Wood has a grain, and the way the bit cuts across it can make a difference. Cutting against the grain can leave rough edges or splinters if your bit’s not sharp.
Wood chips need a way out as you drill. If they pile up in the hole, you get heat and friction, which can burn the wood or dull your bit.
Flutes do most of the chip-clearing, but pulling the bit out every so often helps too. It clears packed chips and keeps your hole tidy.
Select Wood Bits by Hole Type and Project
Different holes need different bits. A pilot hole for a screw isn’t the same as a flat-bottom hole for a hinge, and a dowel hole is a whole other story compared to a big opening for wiring.
Twist Bits for General Holes and Pilot Holes
Twist drill bits are the everyday heroes for wood, metal, or plastic. They’re good for pilot holes, small clearance holes, and most drilling jobs under 1/2 inch.
They come in fractions, wire gauge, letter, and metric sizes. For most furniture or cabinet work, a set from 1/16 inch up to 1/2 inch will cover you.
Twist bits can wander when you start a hole, especially with a handheld drill. Try center-punching your mark first, or get a twist bit with a split point for better accuracy.
Run twist bits fast: up to 3,000 rpm for tiny sizes, slowing down as you get closer to 1/2 inch.
Brad-Point Bits for Clean, Centered Holes
Grab a brad-point bit if you want a precise, centered hole. The sharp center point lands exactly on your mark, so it won’t skate like a twist bit sometimes does.
Brad-points have spurs at the tip that score the wood before cutting, which cuts down on splintering and leaves a cleaner edge. That’s important for visible joinery.
Use brad-point bits for:
- Dowel holes in furniture
- Shelf pin holes in cabinets
- Any spot where alignment and a clean edge matter
Run these around 750 to 1,200 rpm, depending on size. Clear chips often to keep the wood from burning.
Forstner Bits for Flat-Bottom Holes and Hinges
Forstner bits make flat-bottom holes with smooth, straight sides. The rim does the guiding, not the center, so you can overlap holes or drill at an angle without the bit wandering all over.
They’re the pick for:
- Hinge holes, like those big cup hinges on cabinets
- Flat-bottom holes for dowels or hardware that need a solid seat
- Blind holes, where you don’t want to go all the way through
Forstner bits cost more than twist or spade bits, but the precision is worth it for cabinet work. Use a drill press if you can. Run smaller bits around 700 rpm, and slow down to 250 rpm for anything over an inch.
Spade and Auger Bits for Fast or Deep Boring
A spade bit is a flat-bladed tool that makes quick, rough holes from about 1/2 inch up to over 1 inch wide. You can find spade bits just about anywhere, and they’re cheap, but they tend to rip wood fibers instead of slicing them, so the holes look a bit ragged.
When you need a deep hole, reach for an auger bit. Its long spiral and screw tip pull the bit right through thick wood, which comes in handy for timber framing or any job that needs a deep, straight bore.
Both of these bits work best at slower speeds than twist or brad point bits. Spade bits should stay under 1,500 rpm, while auger bits do better under 700 rpm. Go any faster and you risk scorching the wood or losing control.
Hole Saws and Specialty Bits for Large Openings
A hole saw makes big holes by cutting out a full disc instead of just chipping away. Sizes go up to 6 inches, and they’re great for running pipes, wires, or fitting hardware in construction projects.
If you want adjustable hole sizes, a circle cutter gives you that flexibility, but honestly, it’s easier to use one with a drill press than by hand.
Some other bits tackle odd jobs:
| Bit Type | Best Use |
|---|---|
| Installer bit | Running wire through framing |
| Plug cutter | Cutting wood plugs to cover screw heads |
| Vix bit | Centering pilot holes in hinge hardware |
Grab a plug cutter if you want to hide fasteners, especially in furniture where looks matter.
Drill Clean, Straight, and Accurate Holes
Getting a clean hole really comes down to four things: marking your spot, backing up your wood, picking the right speed, and using the right bit for the grain. Skip one and you might end up with a crooked hole, splinters, or burned edges.
Mark Centers and Prevent Bit Wandering
Mark your center point with an awl or a center punch before you drill. That little dent helps the bit bite in instead of skating around.
Twist bits wander the most. Their tips just aren’t wide enough to stay put at the start.
Brad-point bits do a better job here. The center spur digs in while the outer spurs score the wood, so the bit starts right where you want it.
If you’re using a drill press, you’ve got more control since the bit moves straight down. But if you’re drilling by hand, that starter dent is your best friend to keep the bit from drifting.
Clamp Workpieces and Support the Exit Face
Don’t just hold your workpiece with your hand. Clamp it to your bench or drill press table so it can’t move or spin away from you.
Back up the exit side too. Put a scrap piece of wood right under your workpiece and clamp it tight.
The backing board supports the fibers as the bit comes through. Without it, the wood on the bottom just blows out in chunks when the bit exits.
Pick a scrap that’s flat and thick enough to stay put. Make sure both pieces sit flush together before you start. Any gap just means less support and more tear-out.
Control Feed Pressure and RPM
Match your drill speed to the bit size and wood type. Smaller bits and softer woods like higher rpm. Larger bits and hardwoods? Slow it down.
General rpm guide for wood:
- Twist bits under 3/16″: up to 3,000 rpm
- Brad-point bits up to 1/4″: 1,000 rpm
- Forstner bits up to 1″: 500 rpm
- Forstner bits over 1″: 250 rpm
Push the bit in at a steady pace. If you shove too hard, the bit overheats and burns the wood. Too light, and it just rubs, which also builds up heat. For tough woods or metal, a drop of cutting fluid can help cool things down and save your bit.
Avoid Tear-Out, Splintering, and Burn Marks
Tear-out happens when the bit pushes fibers out instead of slicing them clean. This usually shows up on the exit side, especially with twist bits.
A backing board helps by giving those fibers something to press against as the bit punches through. Brad-point bits help too, since their spurs cut the grain before the center drills in.
Burn marks show up if the bit spins in place too long or if wood chips clog things up and trap heat. Pull the bit out every few seconds to clear chips and let it cool down.
Running at the right rpm for your bit size helps avoid burning. A dull bit just makes everything worse, so keep your bits sharp and swap them out when they stop cutting cleanly.
Use Drilling for Screws, Joinery, and Hardware
Drilling isn’t just about making holes. It sets up screws, dowels, and joints so your furniture and cabinets come together strong and clean.
Size Pilot Holes for Screws, Bolts, and Hardwood
A pilot hole guides a screw or bolt into wood without splitting it. This matters most in hardwood, where the fibers are dense and crack easily.
Pick a bit that’s just smaller than the screw’s core, not the threads. For wood screws, go a touch smaller than the shank. Bolts need a pilot hole nearly the same size as the bolt, since they don’t cut threads like screws.
Here’s a quick chart:
| Screw Size | Pilot Hole (Hardwood) | Pilot Hole (Softwood) |
|---|---|---|
| #6 | 3/32″ | 1/16″ |
| #8 | 7/64″ | 5/64″ |
| #10 | 1/8″ | 3/32″ |
If you skip this step in oak, maple, or ash, you often end up with cracked boards or stripped screw heads.
Countersink Screw Heads for Flush Assembly
Countersinking lets screw heads sit flush or just below the surface, so nothing sticks out to snag on things.
Countersink bits cut a cone-shaped recess at the top of the pilot hole. Some combine pilot hole and countersink in one go, which is handy for repeated jobs.
For a deeper recess, use a countersink bit with a bigger counterbore. Then you can cover the screw with a wood plug for a seamless look. Cabinet makers do this a lot on visible panels and doors.
Test your countersink on scrap first. Depth varies by screw head, and if you go too deep, you weaken the wood around the screw.
Drill Dowel Holes and Mortise-and-Tenon Joinery
Dowel holes need to line up just right, or the boards won’t fit. Use a doweling jig to keep the bit straight and centered.
Make sure your bit matches your dowel size. Too loose, and the joint’s weak. Too tight, and you might split the wood when you glue up.
Mortising is different. Usually, you use a drill press with a Forstner or mortising bit to hog out most of the waste, then clean up with a chisel. It’s a classic way to make mortise and tenon joints for chairs, tables, and frames.
For deep mortises, drill in stages and clear out waste often to keep the bit from binding or overheating.
Make Pocket Holes, Hinge Cups, and Wood Plugs
Pocket holes make strong, hidden joints with angled screws. A pocket hole jig guides a stepped bit at the right angle, drilling both the shank and pilot holes in one shot.
This method is great for face frames, cabinet boxes, and quick furniture builds. Pocket hole joints hold up well, but you’ll want to add glue for long-term strength in load-bearing spots.
For hinge installation, you’ll need a different bit. A Forstner-style hinge cup bit makes the round recess for concealed European hinges. Getting the depth right keeps cabinet doors flush and lined up.
A plug cutter lets you cut small plugs from matching wood to cover screw heads in counterbored holes. That way, you get a clean surface with no hardware showing.
Work Safely and Maintain Bits for Better Results
Good habits keep your hands and eyes safe, and a little care for your bits means cleaner holes and longer tool life. It’s not hard, but it does make a difference.
Secure Stock and Protect Eyes, Hands, and Clothing
Always clamp your workpiece before drilling. A loose board can spin or shift and might pull your hand into the bit.
Wear safety glasses or a face shield every time. Wood chips come out fast, even on tiny jobs.
Avoid loose sleeves, gloves, and jewelry. They can get caught in the spinning bit or chuck.
If you’re drilling a small piece, clamp it instead of holding it. Never hold the stock in one hand and drill with the other.
Keep your fingers out of the bit’s path. Plan your grip before you start up the drill.
Clear Chips Safely and Prevent Bit Binding
Wood chips pile up fast in deep holes. Back the bit out every inch or so to clear the flutes and let some air in.
This also helps keep the bit from binding. If it binds, it can snap or twist the drill in your hand.
If you feel resistance, lighten up instead of pushing harder. Let the bit do its thing at its own pace.
For deep holes, pick a bit with deep spiral flutes. They clear debris better than short, general-purpose bits.
Don’t try to free a stuck bit by pulsing the trigger. Stop the drill, then pull the bit out by hand.
Clean, Inspect, Sharpen, and Store Drill Bits
Wipe off your drill bit set after each use. Sawdust and resin dull the cutting edges over time.
Look over each bit for chips, cracks, or bent tips before you use it again. A bent bit will wobble and make a crooked hole.
Sharpen twist bits with a file or sharpening jig when the edges start to dull. A sharp bit cuts cleaner and takes less effort.
Store bits in a labeled case or block by size. That way, the edges don’t bang together and get damaged.
Keep bits dry to prevent rust. A light coat of oil on metal drill bits helps protect them between uses.
Know When Non-Wood Bits Belong in a Mixed-Material Project
Some woodworking projects need other materials, and you’ll want the right bit for each one. If you use the wrong type, you’ll wear it out fast or even crack what you’re working on.
| Material | Bit Type | Notes |
|---|---|---|
| Metal hardware or hinges | Metal drill bits | Cutting fluid helps keep things cool and reduces friction |
| Brick or concrete anchors | Masonry drill bit or masonry drill bits | Switch to a hammer drill setting to move faster |
| Ceramic tiles or tile backsplash | Tile drill bits or tile bit | Go slow at first so you don’t crack the glaze |
| Enlarging holes in thin metal or plastic | Step drill bit or step drill bits | One bit covers several hole sizes |
Always match your bit to the material. You’ll keep your drill bits sharp longer and your project will look way better.
Frequently Asked Questions
Drilling in wood brings up a lot of the same questions. Which drill do you need? What bit should you use? Here are some straightforward answers to help you make cleaner holes and finish your projects with less hassle.
What types of drills are best for common woodworking tasks?
A cordless drill/driver handles most woodworking jobs. It’s good for drilling holes and driving screws without much hassle.
If you’re working on bigger projects, grab a corded drill. You get steady power and don’t have to worry about the battery dying halfway through a bunch of holes.
If you want precise, repeatable holes, a drill press is a solid upgrade for your shop. It keeps the bit at a fixed angle, so your holes end up straight every time.
What are the different types of woodworking drill bits, and when should each be used?
Twist bits are your go-to for small, shallow holes and end grain drilling. They’re everywhere and cut lots of materials, but sometimes leave rough edges on face grain.
Brad-point bits have a sharp tip that stops the bit from wandering. They’re perfect for clean holes in face grain, like when you’re mounting hardware or hinges.
Forstner bits make flat-bottomed holes with smooth sides. They’re great for overlapping or angled holes, though they can get clogged with chips if you drill deep.
Spade bits are fast and handle big holes, but the finish isn’t pretty. Use them for rough work where looks don’t matter much.
Auger bits are made for deep holes and pull themselves through wood with a screw tip. They’re better for rough carpentry than fine furniture.
When should I use a brad-point bit instead of a standard twist bit?
Pick a brad-point bit if you’re drilling into face grain and want a clean, accurate hole. The center spur keeps it from sliding around at the start.
Twist bits are better for end grain or small, shallow holes. They’re also faster if you don’t care about having a perfect edge.
Skip brad-point bits for shallow angles, like 5 to 10 degrees off center. They just don’t cut cleanly at those angles, so a twist bit works better.
How do I choose the correct drill bit size for screws and pilot holes?
Match your pilot hole to the screw’s core, not the outer threads. This way, the screw holds tight without splitting the wood.
For softwoods, use a pilot hole that’s a bit smaller than the screw’s core. In hardwoods, go closer to the screw’s full diameter since hardwood cracks more easily.
Check the screw packaging or a drill bit size chart for the right match. Most charts list bit sizes for common screw sizes, so you don’t have to guess.
How can I drill straight, clean holes in wood without tear-out?
Clamp your workpiece before you drill. This stops the wood from shifting and helps you keep the bit at the right angle.
Put a backer board underneath. It gives the bit something to cut into as it exits, which helps stop splintering.
Start the drill slow and let the bit find its spot. Once it bites, speed up for a smoother, cleaner cut.
If you need holes at a perfect 90-degree angle, use a drill guide or a drill press. They’ll keep the bit steady so it doesn’t wander.
How do countersinking and pilot holes improve woodworking joinery?
Pilot holes give screws a clear path into the wood, so you’re less likely to split it, especially near edges or when you’re working with tough hardwood.
Countersinking lets the screw head sit flush with or just below the surface. That way, things look cleaner, and you won’t have screw heads catching on anything as you move or use the piece.
When you use both pilot holes and countersinking, you get joints that look tidier and hold together better. It’s also a lot easier to cover up screw holes with filler or plugs if you want a really polished finish.