Good woodworking honestly starts before you even touch a saw. It’s all about how well you measure and mark your wood.
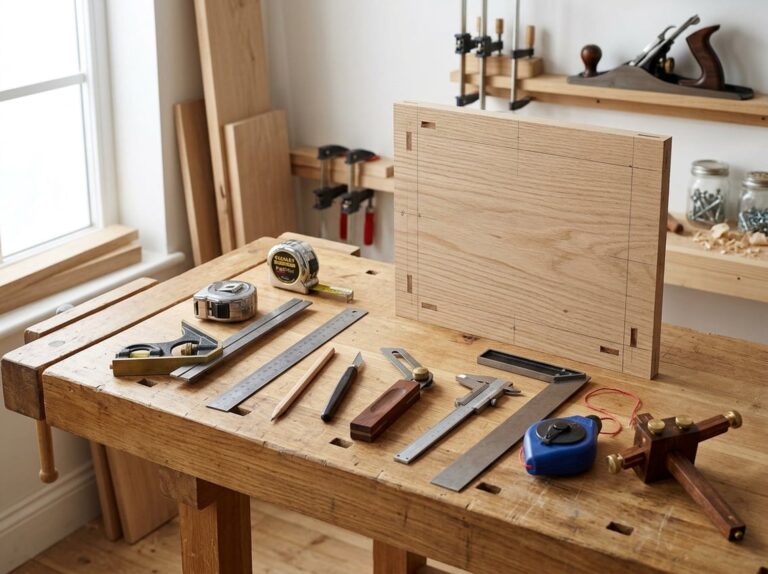
The right measuring and marking tools help you cut accurate parts the first time, which saves wood and saves time. Tape measures, speed squares, combination squares, and marking knives all have their own jobs to do. Once you figure out how to use them together, your projects just fit better and look more finished.
You’ve probably heard “measure twice, cut once.” There’s a reason for that. This guide digs into why that advice matters and how to actually make it part of your process. You’ll get a feel for how each tool works, how to mark crisp lines, and how to dodge those sneaky little errors that can ruin a whole project.
Build a Reliable Measuring and Marking Kit
You don’t need a mountain of tools, just a handful of good ones that you actually check and take care of now and then.
Choose a Tape Measure for Shop Work
Grab a tape measure with a blade at least 3/4 inch wide. Wider blades don’t flop around as much when you pull them out over a longer span.
Check the hook at the end. It should wiggle a bit, about as much as the thickness of the metal.
This little bit of play fixes a common problem. It lets the hook adjust whether you push it against something or hook it over an edge, so your readings stay true either way.
For most shop projects, a 16-foot or 25-foot tape is plenty. Go for one with clear, bold numbers you can see even if the light’s not great.
Some tapes have markings for stud spacing at 16 and 24 inches, which really speeds up framing and cabinet work.
Use Steel Rules, Rulers, and Straightedges
Steel rules give you more precision than a tape measure for shorter stuff. Six to twelve inch rules are perfect for marking joints or checking smaller parts.
Pick one with etched markings, not printed. Etched lines last way longer and sit tight against the wood for better accuracy.
Straightedges are a different animal. Use them to check if a board is flat or to draw long, straight lines across panels.
Get a straightedge made from hardened steel or aluminum. Wooden ones warp over time, which just messes everything up.
Here’s a quick comparison:
| Tool | Best Use | Typical Length |
|---|---|---|
| Steel rule | Small parts, joints | 6–12 inches |
| Straightedge | Flatness checks, long lines | 24–50 inches |
Check Right Angles With Squares
A combination square is one of the most useful tools you can have. It checks 90 and 45 degree angles, and you can also use it for measuring depth or setting a marking gauge.
Loosen the locking knob so you can slide the ruler through the head. Tighten it up once you’ve set your measurement or angle.
A try square only checks 90 degree angles. The blade doesn’t move, so it’s not as adjustable as a combination square.
Most woodworkers keep both around. Try squares are quick for spot checks, while combination squares do more jobs.
A speed square, which is triangular, is great for marking angles on lumber before you cut. Just line up the lip against the edge, then mark along whichever angle you need.
Check your squares often. Hold the blade against a known straight edge and look for gaps. If you see any, the tool’s out of square and you’ll want to fix or replace it.
Add Calipers for Fine Measurements
Calipers let you measure thickness, diameter, and depth more accurately than a rule. Super handy for dowels, drill bits, or joinery parts where you need exact numbers.
Digital calipers give you a number on a little screen. They’re quick and cut down on reading mistakes, which is nice if you’re new to calipers.
Vernier calipers use two scales you line up by eye. They take a bit more practice, but don’t need batteries and hold up in dusty shops.
Both types measure in inches, fractions, and millimeters. Pick whichever matches your comfort zone and how often you need quick readings versus something more rugged.
Keep calipers in a case when you’re not using them. That way, dust and wood chips don’t jam up the moving bits.
Use Squares to Establish Straight and Square Layout
Squares let you draw straight lines, check right angles, and set up accurate cuts. Each type works best for a specific thing, so knowing when to use which one just makes your life easier.
Mark Crosscuts With a Speed Square
A speed square is a triangular tool for marking lines straight across a board. Hook its lip onto the edge of the board, which becomes your reference edge and keeps the square steady.
Once it’s in place, draw your line along the angled side. That’s your cut line, and it’ll be straight every time.
Speed squares also have marks for common angles like 45 degrees, making them handy for angled cuts on trim or framing.
Double-check that your reference edge is straight before you start. If it’s not, your line won’t be either.
Set 90° and 45° Lines With a Combination Square
A combination square has a sliding head and a long ruler (the blade). You can lock the head anywhere along the blade, so it’s good for both measuring and marking.
Use the flat edge of the head to check right angles. Place it against the reference edge, then see if the blade lines up with your material. Any gap means things aren’t square.
The head also has a 45 degree edge for marking angled lines without needing something else.
Try squares do something similar but only check 90 degree angles. They don’t slide or adjust, but they’re solid for basic checks.
Combination squares can help you draw parallel lines too. Set the blade to the length you want, then slide the head along the edge while holding your pencil at the end.
Transfer Unusual Angles With a Bevel Gauge
A bevel gauge (or T-bevel) copies odd angles that aren’t 90 or 45 degrees. Super useful when you need to match an angle from an existing piece.
To use it, loosen the wing nut or lock. Put the handle against one surface and the blade against the other. Once it matches, tighten the lock.
You can now transfer that angle to a new piece of wood. This way, you get a perfect match even if you don’t know the exact degree.
A bevel gauge doesn’t measure angles by itself. If you need the actual number, you’ll want a protractor or angle finder.
Verify Edges and Surfaces Before Layout
Before you start drawing guidelines, check that your reference edge is flat and straight. If it’s warped or rough, every measurement you take from it will be off.
Run a straightedge or the edge of a square along the board. Look for any light peeking through, which means there are high or low spots.
Also, check that the surface you’re marking is flat. A cupped or bowed board can throw your baseline out of whack.
Calibration counts too. Check your squares against a known straight edge every so often to make sure they’re still accurate. If a square’s out of whack, you’ll get crooked lines even if you use it right.
Make Clean, Cut-Ready Marks
Good marks make good joints. A sharp, accurate line tells you exactly where to cut, so your saw or chisel lands in the right spot every time.
Choose Between a Pencil and a Marking Knife
A pencil is fine for rough layout and quick marks. Use a sharp no. 2 or a mechanical pencil, since both keep a fine point longer than those fat shop pencils.
For final layout, switch to a marking knife. It slices through the wood fibers, giving you a thinner, more precise line than a pencil ever could.
This really matters for precise joinery. A knife line also gives your chisel or saw blade something to follow, since the blade drops right into the cut. Save pencils for rough stuff and grab the knife when fit is critical.
Scribe Parallel Lines With Marking Gauges
A marking gauge scribes a line a set distance from the edge or end of your board. It’s perfect for laying out joinery like the shoulders of a tenon or the baseline of a dado.
Wheel marking gauges use a little round blade instead of a pin, so you get cleaner lines with less tear-out, especially across the grain.
If you’re doing mortise-and-tenon joints, a mortise gauge is worth it. It’s got two pins or wheels set to match your chisel or router bit, so it marks both sides of the mortise in one go. Set the gauge against a steel rule or an existing line, then make a few light passes, deepening the line each time instead of forcing it all at once.
Lay Out Mortises, Tenons, Dados, and Rabbets
Each joint needs its own layout, but the goal never changes: mark a clear baseline and shoulder lines before you cut.
| Joint | What to Mark | Tool to Use |
|---|---|---|
| Mortise | Width, depth, and length lines | Mortise gauge, square |
| Tenon | Shoulder lines and cheek lines | Marking gauge, combination square |
| Dado | Two parallel lines across the board | Square, marking knife |
| Rabbet | Depth line and width line | Marking gauge |
For dados and rabbets, use a scrap from the actual mating part as a gauge instead of trusting a printed measurement. That way, tiny differences in material thickness won’t mess up the fit.
Mark the Waste Side and Cut to the Correct Side of the Line
Every cut line has a waste side and a keep side. Before you cut, mark an X or scribble on the waste side, so you don’t get confused halfway through.
Cut so the saw kerf lands in the waste, leaving your knife or pencil line on the finished piece. This is where lots of measurement mistakes happen, since even a tiny error here can make a part just a bit too small.
For tight joinery like mortise-and-tenon, sneak up on the line. Cut just outside the mark, then pare or sand down to the line with a chisel or plane. This gives you a little wiggle room to dial in the fit without overdoing it.
Follow an Accurate Layout Workflow
Getting a good layout isn’t just about having the fanciest tool in the shop. You really need a repeatable process—pick a starting point, check your work, and do things the same way every time. If you stick to this, you’ll get clean cuts and measurements that actually line up.
Work From One Reference Edge and Face
Pick one edge and one face on your board. Mark them so you don’t forget. These become your reference edge and face for the entire build.
Always measure from this edge. Seriously, don’t switch halfway through or you’ll end up chasing tiny errors everywhere.
When you check for square, set your combination square or speed square against the reference edge. Even if the board isn’t perfect, use the flattest, straightest part you have as your reference.
Sticking to one reference point keeps everything lined up. You’ll also find it easier to spot mistakes later, since you always know where your marks came from.
Measure Directly From Matching Parts When Possible
Skip the tape measure when you can. Hold parts right up against each other and mark them directly. It’s faster and you avoid silly math mistakes.
Direct transfer is great for:
- Shelves that need to fit inside a cabinet
- Drawer parts that must match each other
- Trim pieces that need the same length
This approach is usually more accurate than measuring twice with a tape. You can misread numbers, but you can’t misread a mark you made right on the board.
Use a sharp pencil or, better yet, a marking knife. Dull pencils make fat, fuzzy lines that mess up your accuracy.
Use Clamps, Jigs, and a Chalk Line for Repeatability
Clamps keep your boards from sliding around while you mark and cut. Bar clamps hold long boards flat on your bench. Spring clamps are handy for holding a straightedge while you draw a line.
Jigs let you repeat the same cut or mark over and over without re-measuring. Even a simple jig can guide your pencil or saw along the same line every time. This is a lifesaver when you need a bunch of identical parts.
For long, straight lines on plywood or wide boards, grab a chalk line. One snap gives you a straight reference across the whole board. It’s especially good for laying out parallel cuts on big sheets.
Account for Kerf and Final Tool Cleanup
Kerf is the width your saw blade takes out of the wood. Every saw, hand or power, removes a strip as it cuts. If you ignore this, your parts will end up too short.
Mark on the waste side of your line, not the finished side. That way, your part stays the right size.
After cutting, clean up the edge. A block plane can trim you right down to your line. Sandpaper smooths out saw marks.
Keep your blades sharp. Sharp tools give you cleaner cuts and save you from sanding forever.
Apply Measurements to Hand Tools and Power Tools
Once you’ve marked a line, you need your tools to hit it dead on. This means setting up your circular saw, miter saw, table saw, or router the right way, and double-checking your stock before you cut.
Set Up a Circular Saw or Miter Saw for Accurate Cuts
Your circular saw only cuts as straight as its guide. Line up the blade’s edge with your mark, not the base plate. That’s a classic mistake.
For rip cuts, clamp a straight edge to the board. Measure from the guide to the blade at both ends, so you know it’s parallel.
Miter saws need checks too. Before you cut an angle, make sure the fence is square to the blade with a combination square. Don’t trust the factory scales—test them against a known good 45 or 90 degree reference, since they’re often off a bit.
Always cut on the waste side of your line. That one habit saves a ton of headaches with sizing.
Check Table Saw, Router, and Router Table Settings
Make sure your table saw fence sits parallel to the blade. Measure from the blade to the fence at the front and back. If the numbers don’t match, adjust until they do.
Set router bit height with a ruler or height gauge, not just by eye. Even a tiny difference can mess up a joint.
Fence position matters too. Measure from the fence to the bit at both ends to make sure it’s straight.
Quick calibration checklist:
- Blade-to-fence distance (front and back)
- Blade height above the table
- Router bit height
- Fence squareness to the miter slot
Check these every time you swap blades or bits, or start a new project.
Measure Stock Thickness, Depth, and Joinery
Before you start machining, measure your stock’s actual thickness with calipers. Don’t trust the label—lumber sizes are all over the place, and guessing wastes wood.
Set your jointer for thin passes. Check the board’s flatness with a straightedge after each pass. Run it through the planer to get to final thickness, checking with calipers as you go.
For joinery, measure twice before cutting mortises and tenons. Size the tenon to the mortise, not just by eye. Set your marking gauge to the exact mortise width before you lay out the tenon cheeks.
A drill press with a depth stop controls mortise depth. Set the stop with a ruler against the bit, not just by feel.
Use Winding Sticks to Find Twist Before Machining
Winding sticks are two straight, matching boards you set across your workpiece at each end. Sight across the tops. If they don’t line up, your board has twist.
This is especially important on long or wide parts, like table legs, where twist is tough to spot by eye. If the sticks are off, mark the high spots before you joint or plane the board.
If you skip this, you’ll end up with legs that wobble or joints that won’t close. A few minutes with winding sticks can save you from redoing work later, especially on furniture that needs to stand flat.
Prevent Errors and Maintain Precision Tools
Small errors stack up fast in woodworking. If your tool is even a little off, your whole project can go sideways. Regular checks, smart storage, and knowing what to buy will keep your measurements tight and your tools working for years.
Test Squares, Rules, and Tape Measure Hooks
Check your combination square often. Hold it against a straightedge and look for gaps. If you see light, it’s out of square and needs fixing or replacing.
Test your steel rule against another one you trust. Dings or worn edges throw off your measurements.
Tape measure hooks get loose over time, which is normal—they’re supposed to slide a bit for inside and outside measurements. Still, check it every month.
Push the hook in and out. It should move about 1/16 inch, but no more. If it’s bent or floppy, your measurements will be off every time.
Avoid Common Reading and Transfer Mistakes
Reading a tape measure wrong is probably the most common mistake. Always look at it straight on, not from an angle. If you look from the side, your reading can shift by a whole mark.
Mark with a sharp pencil or a marking knife, not a fat marker. Thick lines make it impossible to know where to cut.
When you transfer a measurement, stick with the same tool each time. Switching between a tape and a steel rule can cause small, annoying differences.
Three habits to avoid transfer mistakes:
- Mark with a small “V” or arrow, not just a dot, so you have a clear point
- Double-check every measurement before cutting
- Keep your reference edge consistent for all pieces
For really fine work, digital or vernier calipers give you measurements down to a thousandth of an inch. Use them for joinery that needs a super tight fit.
Clean, Store, and Protect Measuring Tools
Wipe down your tools after each use. Sawdust and resin build up fast and can hide nicks or rust.
Store squares and rules flat. Don’t hang them or stack heavy stuff on top. Even a small bend can throw off your readings.
Put a thin coat of oil on steel tools like your combination square or steel rule. It keeps rust away, especially if your shop gets humid.
Dust collection helps protect your tools too. Less dust in the air means less grime on blades and markings. Wear a dust mask when sanding or cutting—fine dust is bad for your lungs and your tools.
Keep tape measures in a dry spot, away from sunlight. Heat and moisture can warp the case and mess up the spring.
Choose Quality Tools Without Overspending
You don’t need the most expensive brand, but cheap tools often lose accuracy fast. Starrett, Woodpeckers, and Lie-Nielsen are known for tight tolerances and lasting quality.
For everyday stuff, Stanley, Milwaukee, and Empire make solid, affordable tools. Veritas is great too, especially for marking gauges and squares.
Spend more on tools you use all the time, like your combination square and tape measure. These take the most abuse and need to stay accurate.
Save money on tools you only grab once in a while. A basic steel rule from the hardware store works for rough layout.
And don’t forget safety goggles when marking or measuring near power tools like an orbital sander. Hearing protection is smart too if you’re working near loud machines while laying out your next cut.
Frequently Asked Questions
Here are answers to common questions about measuring and marking tools for woodworking. These cover the basics you need to make accurate cuts and avoid costly mistakes.
Which measuring and marking tools are essential for a beginner woodworker?
You need five basic tools to start: a tape measure, a combination square, a speed square, a marking knife, and a pencil.
A 16-foot tape measure works for most shop jobs. You probably don’t need a 25-foot tape unless you’re building something huge.
Your combination square does most of the layout work. Use it to check 90-degree angles, mark lines parallel to an edge, and verify 45-degree miters.
A speed square lets you mark angles and check squareness on bigger boards. Keep a marking knife handy for cuts that need to be spot-on, since it leaves a crisper line than a pencil.
How do you accurately use a tape measure for woodworking projects?
Hook the tape measure’s metal end onto the edge of your workpiece and pull it taut. Even a little slack can mess up your measurement, so keep some steady tension while you check the number.
Look straight down at the marking, not from an angle. If you read the tape from the side, what you see can shift by a small but noticeable amount, and that adds up if you’re making several cuts.
Mark your measurement with a small V-shape or just a single tick mark. Thick pencil marks can cover up to a sixteenth of an inch, which is enough to mess up tight joints.
Check your tape’s hook for looseness. The hook is supposed to move a little to account for the metal’s thickness, but if it gets bent or damaged, all your measurements end up off by the same amount.
What is a speed square used for, and how do you use it to mark angles?
A speed square is a triangular tool that helps you mark 90-degree and 45-degree angles quickly. It also has a built-in protractor scale for other common angles.
To use it, hook the square’s raised edge against the side of your board. Hold it in place, then run your pencil along the edge you need.
For a 90-degree cut, line up the square’s short edge against your board and mark across the face. For a 45-degree angle, use the diagonal edge and make sure the pivot point lines up with your starting mark.
Speed squares work best on straight, flat lumber. If the wood is curved or warped, the square won’t sit flush, so your line might not be accurate.
How do you use and check a combination square for accuracy?
To mark a line parallel to an edge, set the square’s ruler to the length you want, then slide the head along the board’s edge while holding a pencil at the end of the ruler. To check for square, press the head against the edge and see if the blade sits flat with no gaps.
Check your combination square’s accuracy before you trust it on a project. Draw a line against a straight edge using the square, then flip the square and draw a second line from the same spot.
If both lines match, your square is accurate. If there’s a gap, your square is off and needs adjustment or maybe just replacement.
Honestly, it’s worth getting a well-made combination square. A square that’s not true will throw off every cut and joint you make with it, and that’s just frustrating.
Why should you use a marking knife instead of a pencil, and how do you make clean layout lines?
A marking knife cuts a thin groove into the wood fibers, not just a line on top. This groove gives your saw or chisel a real edge to follow, so you get a cleaner, more accurate cut than with a pencil line.
Pencil lines have width, and that width changes depending on how sharp your pencil is. A marking knife line stays consistent every time.
To make a clean line, hold the knife flat against your square or straightedge. Draw the blade toward you in one smooth pass, don’t saw back and forth.
Press firmly enough to score the wood fibers, but don’t push so hard that the blade wanders off the straightedge. For crosgrain cuts, angle the knife a bit so the flat side faces the waste area, which helps prevent tear-out.
How can you prevent common woodworking measurement and marking mistakes?
Measure twice before you cut once. That old rule sticks around for a reason, since you really can’t uncut a board if you mess up.
Try to use the same tape measure or ruler throughout your whole project. If you switch tools, you might run into small differences, since not every tape or ruler matches up exactly.
Mark the waste side with an X or a quick note. It helps you avoid cutting on the wrong side of your line, especially when you’re juggling a bunch of pieces.
Keep your tools clean and free of rust. If your square’s dirty or rusty, it won’t sit flush on the wood. I like to store squares and gauges flat, not hanging, because hanging can bend those thin metal edges after a while.