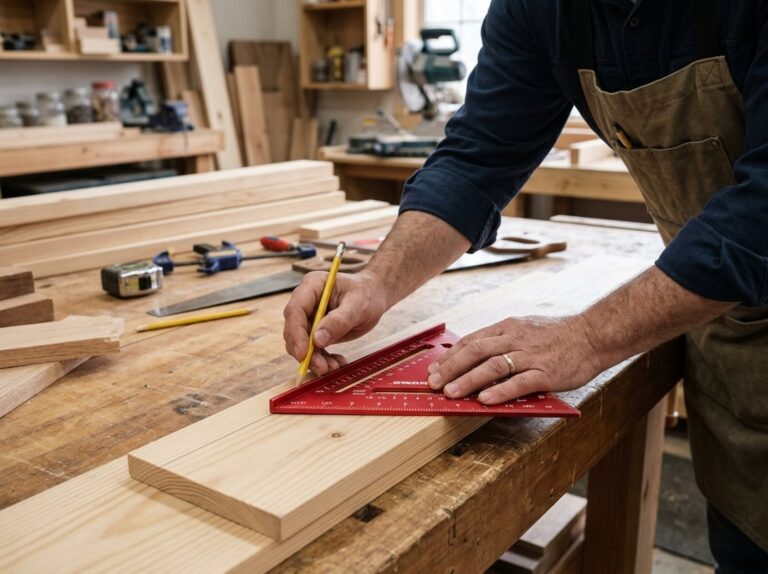
A speed square is a triangular tool that helps you mark straight lines, check angles, and guide your saw cuts. Just hook the square’s lip against the edge of your board, then use its edges to draw accurate lines for cuts and angles. People call it a triangle square or rafter square, and honestly, it can take the place of a handful of other measuring tools in your shop.
If you do carpentry or woodworking, you probably already have a speed square or quick square. Swanson Tool Co. and similar brands make versions with clear markings that are easy to read, whether you’re new to this or have built a hundred decks. Using this tool the right way saves time and helps you avoid those frustrating crooked cuts.
Here’s what you need to know. You’ll pick up the basics of marking straight lines and 45-degree angles, how to keep the square from slipping, and how to use it as a saw guide. There are some care tips and a few beginner tricks in here too, so you get good results without a ton of fuss.
Know the Parts and Choose the Right Square
A speed square has three main parts: the fence, the body, and the pivot point. If you know what each part does, you’ll have an easier time picking the right size and using the tool correctly.
Understanding the Fence, Pivot Point, and Straight Edges
The fence is the short edge that sits at a right angle to the body. Most speed squares have a lipped fence, with a raised lip that hooks over the edge of your board. That lip keeps the tool from sliding around while you mark or cut.
The pivot point is the corner where the fence meets the angled edge, or hypotenuse. You rotate the square around this point when marking angles other than 90 degrees.
The straight edges of the square, including the factory edge, need to be perfectly flat. If you spot a nick or bend, your lines and cuts will be off. Give those edges a quick check before you start a project.
Reading the Ruler Edge, Degree Scale, and Scribe Bar
The ruler edge runs along one side of the square and is marked in inches, usually up to 6 or 7 inches. You can use it to measure width or mark rip cuts.
The angle edge, or hypotenuse, has a degree scale printed on it. This scale acts like a protractor, so you can mark angles from 0 to 90 degrees. On some models, like the Swanson speed square, there’s also a scribe bar or notch for scoring lines with a utility knife instead of a pencil.
Here’s a quick breakdown of what each part does:
| Part | Function |
|---|---|
| Ruler edge | Measures length in inches |
| Degree scale | Marks angles for cuts |
| Scribe bar | Scores precise lines |
| Fence | Hooks on board edge for stability |
Choosing Between a 7-Inch and 12-Inch Speed Square
The 7-inch speed square is the most common for general woodworking. It fits in a tool belt and works great for marking angles, checking square edges, and guiding a circular saw on standard lumber.
The 12-inch size covers wider boards and gives you more room to read the ruler and degree scale. It’s handy for framing or marking cuts across big panels.
If you’re just starting out, go with the 7-inch. It’s lighter, easier to handle, and covers most small to medium projects. If you start working on bigger builds, you can always pick up a 12-inch later.
Checking That a Speed Square Is True
Before you trust a speed square for layout, test it for accuracy. Place the fence against a factory edge of a board and draw a line along the straight edge. Flip the square over, line up the fence on the same spot, and draw a second line.
If both lines match up, your square is good. If not, it’s off and shouldn’t be used for line guides.
This test only takes a minute and can save you from messing up a bunch of boards. Check your square every few months, especially if you’ve dropped it or it’s seen some rough use.
Mark Accurate Straight, Square, and Parallel Lines
A speed square helps you get square cuts and straight lines, so you don’t really need a try square or carpenter square for most basic jobs. Once you get the hang of holding it and using the notches, you can mark crosscuts and parallel lines quickly and with fewer mistakes.
Holding the Fence Firmly Against the Board Edge
The fence, or lip, is the raised edge on the bottom of the speed square. It hooks over the edge of your board and keeps the tool from sliding while you mark or cut.
Press the fence flat against the board edge with steady pressure. Use your non-writing hand to hold it in place the whole time you draw a line.
Don’t let the fence lift or tilt, even a little. A small gap here throws off your 90-degree angle and ruins the accuracy of the cut.
Check that the board edge is clean and free of splinters. Debris under the fence can cause the square to sit unevenly.
Marking 90-Degree Crosscut Lines Step by Step
Here’s how you mark a clean crosscut line:
- Put the fence against the edge of the board closest to you.
- Slide the square to where you want your cut.
- Hold the fence firmly with one hand.
- Draw your pencil along the vertical edge of the square to make a straight, square line across the board.
- Mark an “X” on the waste side, so you know which side to cut.
This method works for framing lumber, trim, and most crosscuts in carpentry. No more guessing by eye and hoping for the best.
Scribing Parallel Lines With the Notches
Speed squares usually have small notches or a scale along one edge for marking parallel lines. These let you scribe a line that’s the same distance from the board’s edge all the way down.
Set your pencil at the measurement you want on the notch or ruled edge. Hook the fence against the board edge, then slide the square down the board, keeping the pencil steady in the notch.
This works for ripping boards to width or marking guidelines for edge trimming. Keep even pressure on the fence as you slide, so you don’t drift off the line.
Using a Marking Knife for Fine Layout Work
For joinery or other precise layout, use a marking knife instead of a pencil. A knife line is thinner and more exact, which matters for tight-fitting joints.
Hold the speed square in place just like you would for a pencil line. Run the knife tip along the edge of the square in one smooth pass, using light or moderate pressure.
Don’t saw back and forth with the knife, since that can wander off the straight edge. One clean pass gives you a crisp scribe line that’s easy to follow with a chisel or saw.
Lay Out 45-Degree and Custom Angles
A speed square is great for 45-degree angles and other common cuts. It also handles custom angles using the built-in protractor scale, which really comes in handy for trim, picture frames, and rafter angles.
Marking a Fast 45-Degree Miter Line
To mark a 45-degree miter cut, hook the lipped fence of the speed square against the edge of your board. Line up the angled edge, which is the hypotenuse, over the spot where you want your cut.
Hold the square steady with one hand and keep it flat against the wood. With your other hand, run a pencil along the angled edge to draw your line.
This is way faster than messing with a protractor or combination square for basic miter cuts. It’s a favorite for trim work and angled cuts where you just want to get it done.
Using the Pivot Point and Protractor Scale
For angles besides 45 or 90, use the pivot point at the square’s corner. Put this point on the edge of your board where you want the angle to start.
Rotate the square around the pivot point until the edge lines up with your target number on the protractor scale. Most speed squares mark degrees from 0 to 90 along that curved edge.
Hold the pivot point steady with one finger while you turn the square with your other hand. Once the angle lines up, mark along the edge with your pencil. This is the go-to move for rafter angles and other layout that needs specific degree marks.
Transferring Angles for Trim and Picture Frames
If you need to match an existing angle, a speed square can transfer that angle to a new piece of wood. Hold the square against the original cut and note where the edge lines up on the protractor scale.
Move the square to your new board and set it to the same degree reading. Mark your line, then cut.
This works well for picture frames, where all four corners need matching 45-degree miters. It’s also handy for trim around doors and windows, especially when walls aren’t perfectly square. For weird angles, a combination square can back up your speed square by locking in an exact measurement to double-check your mark.
Avoiding Common Angle-Markup Errors
Small mistakes in angle marking lead to gaps in trim and picture frames. Here are the most common errors and how to dodge them:
- Letting the square slip. Keep the fence pressed tight against the board’s edge the whole time you’re marking. Even a little slip changes your angle.
- Misreading the protractor scale. Double-check you’re using the right number, since some scales list degrees from both directions.
- Marking from the wrong pivot point. Make sure the pivot corner is flush with your board’s edge before you rotate the square.
- Ignoring board curves or radius edges. A speed square works best on straight edges. For curves or radius cuts, grab a flexible curve tool or template instead.
Double-check your angle with another tool, like a miter square, before you cut. That extra step can save you from wasting lumber on a bad cut.
Use the Square as a Guide for Saw Cuts
A speed square works as a saw guide for a circular saw when you need a fast, accurate 90° or 45° cut. This method keeps your blade on track for both crosscuts and short rip cuts on smaller boards.
Setting the Saw Offset Before Making a Cut
Before you cut, remember the saw’s base plate has some width to it. The edge of the base plate doesn’t line up exactly with the blade.
Measure from the edge of the saw shoe to the blade’s teeth. That’s your offset.
Add this offset to your cut line when you set the square. If you forget, your cut could end up on the wrong side of the line.
- Mark your cut line first
- Measure the offset on your saw
- Position the square that distance away from the line
- Double check before cutting
Guiding a Circular Saw on Narrow Boards
A speed square works well as a saw guide on boards up to about 8 inches wide. Hold the square flat against the wood, with the lipped fence pressed against the factory edge.
Line up the vertical edge of the square with your offset mark. Keep your free hand pressed down on the square so it doesn’t shift.
Push the saw base against the square’s edge while you cut. Move at a steady pace and let the blade do the work.
This method is good for framing lumber and smaller plywood pieces. On wider boards, the square just isn’t long enough to guide a full cut safely.
When to Use a Clamped Straightedge Instead
A speed square isn’t meant for long rip cuts. If your board is more than 8 or 10 inches wide, it’s better to use a straight edge clamped along your cut line.
A clamped straightedge stays put, so you can guide the saw with both hands. This lowers your risk of drifting off the line.
Use this setup for:
| Task | Tool |
|---|---|
| Short crosscuts | Speed square |
| Long rip cuts | Clamped straightedge |
| Sheet plywood breakdown | Clamped straightedge or circular saw guide |
| Curved or detail cuts | Jigsaw |
If you need repeated, precise crosscuts, a miter saw is still the better choice when you have one around.
Safe Cutting Practices and Clean Cut Results
Always cut on the waste side of your line, not right on it. That way, your finished piece is the exact length you marked.
Keep your fingers clear of the blade path and never remove the square while the saw is running. Wait for the blade to stop before you move anything.
Make sure the square sits flat and tight against the board before every cut. A loose grip is usually why cuts end up angled or wandering off in wood.
For cleaner plywood cuts, use a fine-tooth blade and go slow near the edges. That helps reduce splintering on the top face.
Apply the Square to Everyday Woodworing Layout
A speed square helps you spot problems before you cut. Use it to check joints, space out repeated marks, set common angles, and double-check other layout tools for better accuracy.
Checking Boards, Joints, and Assemblies for Square
Before you glue or fasten anything, check that your pieces meet at a true 90 degrees. Place the square’s lip against one edge and press the body flat against the other surface.
Any gap between the square and your workpiece means the joint isn’t square. This matters most at corners, box frames, and cabinets, where small errors add up fast.
Check boards for square before you cut them to length. A board with an out-of-square end can mess up your whole layout, even if your other measurements are right.
For longer assemblies, a framing square or carpenter’s square gives you more surface contact than a speed square. Use whichever tool fits your project best.
Marking Repeated Cuts and Stud Locations
If you need several boards cut to the same length, a speed square speeds up the marking process. Hook the lip against the board’s edge, mark your line, then move to the next piece.
This works for layout jobs like stud spacing. Mark your first line, measure your spacing (16 or 24 inches on center is typical), then use the square to draw each straight line square to the edge.
Quick steps for repeated marks:
- Set your tape measure to the right spacing.
- Mark a single point at each measurement.
- Hook the speed square’s lip on the board edge at that point.
- Draw a straight line across the board face.
This keeps every mark consistent, which is important in framing since stud layout affects how panels and drywall line up later.
Setting Up Simple Miter and Bevel References
A speed square gives you a fast way to set up 45-degree miters. Just align the square’s angled edge with your board, and mark along the hypotenuse for a 45-degree line.
This trick works for trim, picture frames, and simple box joints. It’s not a substitute for a miter saw when you need precision on a bunch of pieces, but it’s a solid way to double-check your saw’s angle before you cut.
For bevels, use the square’s degree markings to check that the saw blade tilt matches your project’s needs. Set the saw to the angle you want, then hold the square against the blade to see if it’s right before you make test cuts on scrap.
Using the Square Alongside Other Layout Tools
A speed square works best as part of your toolkit, not as the only layout tool. Pair it with a combination square for marking depth lines or checking 45-degree miters on small pieces.
Use a try square for fine woodworking joints where you need a really clean, precise 90-degree reference on a small scale. For bigger layout work, like squaring up a wall frame or sheet goods, a framing square gives you more length and stability.
A level still does what a speed square can’t: checking if a surface is plumb or level, not just square. Keep all four tools handy and pick the one that fits your project’s size and accuracy needs.
Read Rafter Scales for Basic Framing Projects
The rafter scales on a speed square help you mark plumb cuts, seat cuts, and basic rafter layouts without much math. Roof pitch, rise over run, and the common rafter scale all work together for accurate framing angles.
Understanding Roof Pitch as Rise Over Run
Roof pitch tells you how steep a roof is. It’s written as rise over a 12-inch run, like “6 in 12” or “8 in 12.”
The rise is how many inches the roof goes up for every 12 inches it goes across. Most houses fall between 4 in 12 and 9 in 12.
You need to know your roof pitch before you use the common rafter scale. Check your building plans or measure an existing roof to find it.
Once you have the pitch, line up your speed square to match it. This gives you the exact angle for common rafter cuts on your project.
Using the Common Rafter Scale for Plumb Cuts
The common rafter scale sits on the body of your speed square, near the pivot point. It has numbers from 1 to 12, each matching a roof pitch.
To mark a plumb cut, find your pitch number on the scale. Line up that number with the edge of your rafter board.
Hold the square firmly against the board. Then trace along the angled edge to mark your plumb cut line.
This cut will sit vertical once the rafter is installed. The common rafter scale works this way for most standard layouts, so it’s handy for basic roof framing projects.
Marking Seat Cuts and Birdsmouth References
A seat cut is the flat notch cut into a rafter where it rests on the top plate of a wall. This notch is part of what’s called a birdsmouth cut.
To mark a seat cut, first mark your plumb cut using the common rafter scale. Then measure down along that plumb line to where the rafter meets the wall plate.
From that point, use the speed square to mark a line perpendicular to the plumb cut. That second line becomes your seat cut.
Key steps for seat cuts:
- Mark the plumb cut first
- Measure the correct depth along the plumb line
- Draw the seat cut line at a right angle to the plumb line
- Double-check both lines before cutting
Getting this notch right keeps your roof rafters sitting level and secure on the wall.
Knowing When Hip and Valley Layout Needs More Detail
Hip and valley rafters are different from common rafters. They sit at an angle where two roof planes meet, so they need a separate scale.
Most speed squares include a “Hip-Val” scale next to the common rafter scale. This scale gives you the extra angle needed for these rafters.
Basic rafter layout for hip and valley rafters is trickier than common rafter work. The end cuts often need compound angles, not just a single plumb cut.
If you’re new to framing, start with common rafters before trying hip or valley layouts. For complex roofs, it’s also smart to check a rafter table or worksheet for your exact pitch, since small errors add up fast on long rafters.
This same layout logic works for other projects too, like stair stringers, where stair gauges help you repeat angles accurately across multiple cuts.
Prevent Slips, Maintain Accuracy, and Store It Well
A speed square only helps if it stays put while you mark. Small habits with grip, pressure, and storage keep your lines sharp and your tool ready for the next project.
Improving Grip and Preventing the Fence From Shifting
Press the lipped fence firmly against the edge of the board before you make any mark. If the fence lifts even a little, your angle will be off.
Use your non-dominant hand to hold the fence tight against the wood. Spread your fingers out for better control instead of gripping the tool at just one point.
For extra grip, push the square forward a bit into the edge as you mark. This keeps the fence locked against the board, so it doesn’t drift sideways.
On rough lumber, check that no sawdust or debris sits between the fence and the edge. Even a small chip can throw off your speed square angles by a few degrees.
Keeping Pencil Lines Visible and Precise
Use a sharp pencil, not a dull one. A fine point hugs the straight edge of the square better and leaves a thinner, more accurate line.
Hold the pencil at the same angle as you drag it along the ruler edge. Changing the angle mid-line can shift your mark off course.
For darker or more visible lines, try these options:
- Mechanical pencil, gives a consistent line width
- Carpenter’s pencil, better for rough or outdoor lumber
- Marking knife, creates a fine scored line for fine woodworking
Always mark from the pivot point outward in one smooth motion. Stopping and starting can make doubled or shifted lines.
Cleaning and Protecting the Markings and Edges
Wipe down your speed square after each use, especially if you’re working with treated lumber or outdoor framing materials. Sawdust and resin can hide the printed numbers over time.
Use a damp cloth for cleaning. Don’t soak metal squares, since trapped moisture can cause rust on the edges.
Check the edges regularly for nicks or burrs. A damaged edge will throw off every straight line you try to mark after that point.
Store the square away from other metal tools that could scratch it. Deep scratches on the ruler edge make measurements harder to read.
Beginner Habits That Improve Every Layout
Always double-check your first mark before cutting. That quick second look can catch misalignment before you end up wasting a board.
Get in the habit of holding the square the same way every time. When you build up muscle memory, layout work gets faster and easier.
Keep your speed square in the same spot in your toolbox or apron pocket. You’ll avoid damage and always know where it is.
Treat your speed square with care, just like you would a level or tape measure. If you want accuracy in framing, you need tools that stay true, not ones that get tossed around.
Frequently Asked Questions
Speed squares really shine when you get the hang of a few basic techniques: how to hold the tool, mark angles, and keep it steady while you cut. Here are some answers to questions that pop up when people start using one.
What is a speed square and what are its main uses in woodworking?
A speed square is a triangular tool, usually metal or plastic. It’s like a ruler, a 90-degree square, and a protractor all mashed together in one flat piece.
You can check if a board’s end is square, mark straight cut lines, and even guide a circular saw with it. The angle markings from 0 to 90 degrees let you lay out angled cuts without hunting for a separate protractor.
Most speed squares come in 7-inch and 12-inch sizes. The 7-inch one is handier to carry, while the 12-inch covers wider boards.
How do you hold a speed square securely to mark a straight, square line across a board?
Hook the raised edge, or lip, of the square against the edge of the board closest to you. Press it so there’s no gap between the lip and the wood.
Hold the square down with your non-writing hand, fingers spread out for even pressure. Use your other hand to draw the pencil line in one smooth motion along the square’s edge.
Don’t squeeze so hard that the square shifts. A steady, relaxed grip usually works best.
How do you use a speed square to mark an accurate 45-degree angle?
Find the “degrees” label or the number scale along the angled edge of the square, called the hypotenuse. Locate the 45-degree mark.
Put the square’s lip against the board’s edge. Pivot the square on its 90-degree corner until the 45-degree mark lines up with the edge.
Hold the square steady and draw your line along the pivot side. It doesn’t hurt to check your line against the board edge before cutting, just to make sure the angle looks right.
Can a speed square be used as a guide for circular saw cuts, and how do you prevent it from slipping?
Yes, a speed square works as a saw guide for straight cuts. Hook the lip over the board’s edge, then rest your circular saw’s shoe against the square’s vertical edge before you start the cut.
To keep the square from slipping, press down with your free hand and keep your fingers out of the saw’s path. Some folks stick a strip of sandpaper or rubber under the square for more grip.
Start the saw before it touches the wood and keep steady pressure on the square the whole time. If the saw shoe drifts off the square’s edge, your cut will wander.
How do you use the angle scale on a speed square to mark angles other than 45 degrees?
The angle scale on the hypotenuse shows degree marks, usually from 0 to 90. To mark an angle, put the square’s lip against your board’s edge and pivot it on the 90-degree corner until the number you want lines up with that edge.
These markings measure the angle from a line perpendicular to your board’s edge, not from the edge itself. If you need the angle measured from the edge, subtract your number from 90 to get the right mark.
For better control while pivoting, brace your thumb at the square’s corner. That helps keep the tool from sliding as you find the angle.
What are the best ways to clean, store, and maintain a speed square for accurate layout work?
After each use, just grab a dry cloth and wipe off your speed square to clear away sawdust and debris. If you’ve got a metal one, keep it away from moisture so it doesn’t rust. With plastic squares, try not to leave them baking in the sun or sitting in a hot car, since they can warp pretty easily.
It’s better to store your square flat in a drawer or hang it on a hook instead of tossing it in a tool bag. That way, you’re less likely to get dents or scratches that mess with its accuracy.
Every so often, check your square against a straight edge or another square to make sure it’s still true. If you spot any bends, cracks, or if the markings are wearing off, it’s probably time for a replacement. Accurate cuts are worth it, right?