A chisel might seem basic, but it’s hard to beat for versatility in woodworking. If you keep it sharp, you can cut, trim, and shape wood with more control than just about any power tool. Whether you’re cleaning out a joint or making a tiny adjustment, a chisel gives you real precision.
Chisels come in all sorts of types, but bevel-edge chisels are usually the go-to for most folks. You’ll use them for paring, cutting joints, and smoothing edges. Learning how to hold, sharpen, and care for your chisel makes a big difference in both safety and your results.
This guide gets you started. You’ll see how to work with the grain, keep your tools sharp, and stash your chisels so they last. These basics show up in nearly every woodworking project, whether you’re making repairs or tackling some tricky joinery.
Choosing the Right Chisel for the Job
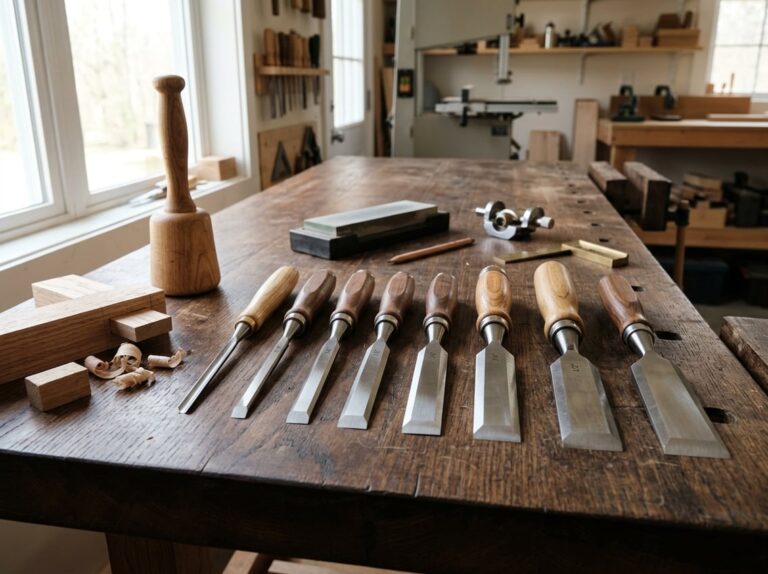
Different jobs need different chisels. Bevel-edge chisels handle most general work, mortise chisels take care of heavy joint-cutting, and some specialty tools help with tight corners or delicate paring.
Why Bevel-Edge Bench Chisels Are the Best Starting Point
Honestly, a bevel-edge bench chisel is hard to beat as a first tool. With angled sides, you can sneak into tight corners and dovetail joints without the sides getting in your way.
They’re pretty flexible. You can chop waste, pare thin shavings, and clean up joints all with one tool.
Firmer chisels have thicker, straight sides. They’re tougher, but they can’t reach into sharp angles like bevel-edge chisels do.
For most projects, a set of five bevel-edge chisels—1/4″, 3/8″, 1/2″, 3/4″, and 1″—covers it. If you’re only picking one to start, grab a 1/2″. It’s probably the most useful size.
When to Use a Mortise Chisel for Mortises and Tenons
Mortise chisels are built for one thing: cutting mortises for tenon joints. They’re thicker and heavier, so they can take the pounding needed to dig out a deep mortise.
Bevel-edge chisels just aren’t built for that kind of abuse. The blade is too thin for prying out big chunks, and it can twist or even snap.
Mortise chisels come in different styles—English, Japanese, Continental. The English type has an oval handle that helps you keep things lined up with the joint.
You really only need one mortise chisel, sized for your usual work. Add more only if your projects change.
Where Paring and Butt Chisels Excel
Paring chisels have long, thin blades designed for hand pressure. You use them to shave off thin layers for fine-tuning joints, cleaning up tenons, or smoothing a surface.
Since you push these by hand, a comfy, longer handle helps you stay in control during slow, careful cuts.
Butt chisels are short and stubby. They’re handy for tight spots, like when you’re fitting hinges in a door or drawer face.
Both types give up power for precision. They’re not for heavy chopping.
Specialty Options for Dovetails, Corners, and Tight Spaces
Sometimes you need a chisel made for a very specific job. Fishtail chisels, for example, have a blade that flares out, letting you clear half-blind dovetail sockets where a standard chisel just can’t reach.
Corner chisels cut sharp, square corners in one go—great for mortises with crisp inside edges. Instead of fussing with the corner by hand, you press the L-shaped blade straight down and it does the trick.
Japanese chisels are worth a mention too. Many have a hollow back for quicker flattening and sharpening, and the steel often keeps an edge longer than typical Western chisels. Some folks swear by them.
You don’t need every specialty chisel out there. Only buy them when you actually run into a job that calls for it.
Building a Practical Beginner Chisel Kit
You don’t need a huge kit to start. Just pick up a few bevel-edge bench chisels in common sizes, then add more only when you need them.
Here’s a good starter kit:
- 1/4″, 1/2″, and 3/4″ bevel-edge chisels – covers most trimming and joint work
- One mortise chisel – match it to your usual wood thickness
- One butt chisel – perfect for hinges and tight spots
Skip the specialty stuff until you really need it. Buying too many chisels at the start just means more sharpening and maintenance, and honestly, it doesn’t help your work much.
Chisel Anatomy, Construction, and Edge Geometry
A chisel’s made up of a few main parts: the blade, the bevel, the tang or socket, and the handle. Understanding how these pieces fit together helps you pick and care for your chisels.
Blade Profiles, Side Bevels, and Cutting Edges
The blade is the metal part that actually cuts. Most bevel-edge chisels have angled sides so you can reach into tight corners like dovetails.
The back of the blade should be flat, since you use it to guide the chisel along a joint or flush cut.
The cutting edge is right at the tip, where the bevel meets the flat back. To keep it sharp, both surfaces need to be flat and polished right to the edge.
Some chisels have a straight edge with no side bevel—better for heavy chopping like mortises, since there’s more metal behind the edge.
Tang Construction, Socket Chisels, and Handle Durability
A tang chisel has a thin metal shank that fits into a hole in the handle. Tang construction is common because it’s cheaper to make.
If the tang fits tight and the handle’s solid, it can handle a decent amount of mallet work without cracking.
A socket chisel works differently. The handle fits into a cone-shaped socket in the blade.
Socket designs usually last longer under heavy use, since the handle sits inside the metal. If the handle breaks, you can replace it pretty easily.
Some modern chisels look like socket chisels but are really tang chisels with a socket-looking collar. If you care about the difference, check the handle closely.
Ferrules, Hoops, and Striking Surfaces
A ferrule is a metal band—usually brass or steel—wrapped around the handle where it meets the tang. It keeps the wood from splitting when you hit the chisel.
Chisels for mallet work often have extra reinforcement at the top, like:
- A steel hoop at the handle’s end
- A leather washer to soak up shock
- A metal cap for heavy pounding
Without these, repeated mallet blows can crack or mushroom the handle. If you plan on a lot of chopping, pick a chisel with a tough ferrule and striking end.
Selecting a Bevel Angle for Paring or Heavy Work
The bevel angle changes how a chisel cuts and how long the edge lasts. A lower angle, say 20 to 25 degrees, is great for paring since it slices wood with less effort.
For heavy chopping or mortising, a steeper angle—30 to 35 degrees—holds up better. That thicker edge is less likely to chip when you whack it with a mallet.
Softwoods are more forgiving, so you can use a lower bevel angle. Hardwoods usually need a steeper one or you’ll lose your edge fast.
If you’ve only got one set of chisels, setting the bevel around 25 degrees is a pretty safe compromise for most work.
Core Techniques for Clean, Controlled Cuts
Clean chisel work is all about control. How you grip the chisel, how you read the grain, and whether you pare or chop all make a difference in the end result.
Holding and Guiding a Chisel With Both Hands
Try to keep both hands on the chisel when you can. Your main hand grips the handle and drives the cut, while your other hand steadies the blade near the tip to guide it.
This grip gives you more control than just pushing with one hand. It also helps prevent slips, since your guiding hand can act as a brake if the tool moves too fast.
For fine paring, choke up on the blade with your guiding hand close to the edge. That way you can feel even small changes in the wood.
Always keep your hands behind the blade. Don’t put fingers in front of where it’s moving—you really don’t want to test how sharp your chisel is that way.
Reading Grain Direction Before You Cut
Wood grain rarely runs straight. If you cut against it, the chisel can dig in and tear out chunks instead of giving you a smooth surface.
Look at the side of your board before you start. Usually, you’ll see grain lines rising or falling in one direction.
Cut so the edge moves with the grain, following the direction the lines rise. This way, each shaving peels off clean instead of splitting deeper into the wood.
If you’re not sure which way the grain goes, make a light test cut. If it tears, just flip your cutting direction and try again.
Paring Cuts for Trimming and Final Joint Fitting
Paring is slow and careful, meant for small adjustments—not hogging out lots of wood. You push the chisel by hand, no mallet, to shave off thin layers.
A paring chisel is perfect for this, with its long, thin blade that flexes a bit and fits into tight spots. A regular bench chisel can also handle most paring.
Use paring cuts to:
- Fit tenons into mortises snugly
- Trim dovetail joints for tight, gap-free corners
- Smooth flat surfaces after rough shaping
- Fine-tune joinery until the parts fit just right, without forcing them
Take off a little at a time. If you remove too much, you can’t put it back, and you’ll end up with loose joints.
Chopping Waste Safely With a Mallet
Chopping is how you quickly remove larger chunks of waste, usually when you’re cutting mortises or shaping joint walls. Instead of pushing the chisel by hand, you strike its handle with a mallet.
Hold the chisel vertically, bevel facing the direction you want the waste to go. Use short, controlled mallet taps, not big swings.
A mortise chisel works best here. Its thick blade doesn’t twist much and can take repeated blows without getting damaged.
Work in small sections, chopping partway down, then clear out the waste before you keep going. That way, you avoid splitting wood past your layout lines.
Cleaning Mortises, Dovetails, and Tenon Shoulders
Once you’ve cleared out most of the waste, use chisels to clean up and square the joint. This step really affects how well two pieces of joinery fit together.
For mortises, pick a chisel that matches the mortise width. Clean the side walls first, then flatten the bottom with the bevel facing down.
For dovetails, grab a narrow bevel-edge chisel and pare away small bits of waste between pins and tails. Check the fit often. Dovetail joints only work when the surfaces are tight and precise.
For tenon shoulders, set the chisel in the scribed line and pare straight down. This gives you a crisp, flat shoulder that seats fully against the mating piece.
Sharpening for a Durable, Razor-Clean Edge
Sharp chisels cut cleanly and safely. Dull ones rip wood and can slip. To get a razor edge, you need to flatten the back, set the bevel, hone carefully, strip away the burr, and know when a quick touch-up just isn’t enough.
Flattening and Polishing the Back
Before sharpening the bevel, make sure the back is flat. This is the surface that rests on your stones. If it’s not flat, your edge won’t be either.
Flatten only the bottom two inches of the chisel. Start with a coarse stone, maybe 800 grit, and work the back in small circles or straight passes until scratch marks cover the whole edge.
Move to finer stones after that. This step polishes out the coarse scratches and gives you a smooth, mirror-like surface. You only need to redo this if the back loses its flatness or the flat part wears down from sharpening.
Establishing the Primary Bevel
The primary bevel is that angled surface forming your cutting edge. Most chisels use a 25 to 30 degree bevel, though you might tweak that depending on the wood or the job.
Start with a coarse-grit stone to shape the bevel and remove nicks. As you work, you’ll feel a slight ridge, a burr, form along the back edge. That tells you the bevel met the back at a true edge.
Once you get a burr across the full width, move to finer stones. Work up through the grits until the bevel looks polished and even.
Using Honing Guides for Consistent Results
A honing guide holds your chisel at a fixed angle while you sharpen, so you don’t have to guess. It clamps onto the blade and rolls across the stone, keeping the bevel steady each stroke.
Honing guides are especially handy if you’re new to sharpening or if you switch between chisels with different bevels. To set the guide:
- Measure the blade’s extension from the guide to hit your target angle
- Lock the chisel in place before sharpening
- Keep even pressure as you push the blade across the stone
Once you get the feel for a sharp edge, you might find freehand sharpening faster. But until then, a guide keeps things consistent.
Removing the Burr With a Leather Strop
After honing, a small burr usually lingers along the edge. A leather strop removes this burr and refines the edge to a cleaner finish.
Stropping is simple. Rub a little honing compound on the leather, then drag the chisel backward across it, bevel side down, at the same angle you used for sharpening. Do this a few times on each side.
Don’t push the edge forward into the strop, or you’ll dig into the leather and dull the blade. Just a few light passes polish the edge and take off any remaining burr, leaving you with a smooth, sharp finish that’s ready for detail work.
Knowing When to Hone and When to Regrind
Honing is a quick touch-up that keeps a sharp edge working. Hone your chisel often, sometimes several times during a single project, especially with dense or abrasive wood.
Regrinding is a different job. It reshapes the bevel from scratch and is needed if the edge is chipped, rounded, or just too far gone for honing to help. You’ll need a bench grinder or coarse stone to reset the bevel angle before you go back to honing.
If honing on your finest stone doesn’t restore sharpness in a few strokes, it’s probably time to regrind.
Safe Handling and Common Beginner Mistakes
Chisel safety starts before you even make a cut. Secure your workpiece, keep hands clear of the blade, and pick the right tool for the job if you want to avoid accidents or messed-up joinery.
Securing the Workpiece Before Any Cut
Never chisel wood that can shift or slide. Clamp your workpiece to a bench, or use a vise to hold it tight.
If the wood moves while you cut, the chisel can slip and hurt you. It can also ruin your joinery by sending the blade off in the wrong direction.
For small pieces, use bench dogs or a holdfast. Bigger pieces might need two or more clamps to keep them from rocking while you chop.
Always test the stability of your workpiece with light pressure before you start. Spending a few extra seconds on setup can save you from a big mistake.
Keeping Hands and Body Out of the Cutting Path
Never put your hands in front of the chisel’s edge. Keep them behind the blade, even for light paring cuts.
When you guide the chisel with your other hand, grip the blade or handle, not the spot in front of it. That way your fingers stay safe if the tool slips.
Set up so if the chisel slips, it moves away from you, not toward you. Don’t chisel toward your body or your supporting hand.
Keep your work area clear. A cluttered bench raises your odds of a bump or slip.
Preventing Slips, Splits, and Tear-Out
Sharp chisels are safer than dull ones. Dull blades need more force, which makes slips and loss of control more likely.
Work with the grain, not against it. Cutting against the grain can split or tear out the wood, sending your chisel off course.
Try these to reduce tear-out:
- Take thin, controlled cuts instead of deep gouges
- Angle the chisel a bit to slice, not just push straight
- Score your cut line with a knife for cleaner edges
When mortising, remove just a little material at a time. Trying to take out too much in one go can split the wood or push your blade off line.
Choosing a Wooden Mallet Instead of a Metal Hammer
Always use a wooden mallet, not a metal hammer, on your chisel. A wooden mallet gives you control and won’t damage the handle.
Metal hammers can crack or split wooden handles over time. They also mushroom the handle end, leaving sharp edges that can cut you.
If your chisel has a metal-capped handle, it might be meant for a hammer, but check the manufacturer’s info first.
For most bevel-edge chisels in joinery, stick with a wooden or rubber mallet. It gives you the right force for controlled chopping and doesn’t shock the blade.
Errors That Damage Chisels or Ruin Joinery
One mistake people make is using a chisel to pry wood loose. That can bend or snap the blade. Chisels aren’t made for leverage.
Skipping regular sharpening is another. A dull chisel forces you to push harder, which leads to bad cuts and more slips.
Beginners sometimes chop mortises too aggressively, taking big chunks instead of working in thin layers. That can crack the wood or leave rough, uneven joint walls.
Storing chisels loose in a drawer, where blades bang into other tools, dulls the edge and can chip the bevel. Always store chisels with blade guards or in a dedicated spot to protect the cutting edge.
Storage, Maintenance, and Long-Term Care
Good chisels can last decades if you clean them, protect their edges, and store them right. A little care after each use saves time on sharpening later and keeps your tools safe to handle.
Cleaning and Rust Prevention After Use
Wipe your chisel blade every time you finish. Wood resin, sap, and moisture build up on the steel and cause rust if you leave them there.
Use a dry cloth first. For sticky residue, add a little mineral oil or rust-prevention spray to the cloth.
Check for spots of surface rust. If you see any, rub them off with fine steel wool before they spread.
A light coat of oil on the blade protects it between uses. This matters most in humid shops or when you store tools in an unheated space.
Don’t ignore the handle. Wood handles can dry out or crack if you never clean or condition them.
Protecting Cutting Edges With Blade Guards
A sharp chisel edge is fragile. It can chip or dull if it bangs into other tools in a drawer.
Blade guards fix this. These simple caps, usually plastic or leather, slide over the cutting edge when you’re not using the chisel.
You can buy blade guards sized for your chisel, or make your own from leather or foam. Either way, just make sure it covers the edge completely.
Always put the guard on right after sharpening. That’s when the edge is most vulnerable.
Blade guards protect you, too. A covered edge lowers your risk of getting cut when you reach into a tool bag or drawer.
Storing Chisels in Racks, Rolls, or Dedicated Cases
The way you store your chisels really matters for keeping them sharp and in good shape. If you just toss them loose in a drawer, they’ll bang into each other and lose their edge fast.
Here are three storage options people usually go for:
- Wall racks: These keep chisels visible and easy to grab, especially if you have some wall space close to your bench.
- Tool rolls: Canvas or leather rolls with pockets for each chisel. They’re handy if you need to carry your chisels around or tuck them in a tool chest.
- Dedicated cases: Wooden or foam-lined cases keep every chisel separated and safe. Great for premium chisels or those with delicate handles.
No matter which you pick, just make sure the cutting edges don’t touch other metal tools. That simple habit saves you from most chipping and dulling between uses.
Inspecting Handles, Ferrules, and Edges Before Use
Before you get started, take a quick look at your chisel. This quick check can catch issues before they turn into accidents.
Start with the handle. Look for cracks, splinters, or any looseness where it joins the blade.
If you have a chisel with tang construction, the metal tang runs into the handle. Make sure the ferrule (that metal ring at the neck) is tight and not cracked. A loose ferrule could let the handle split when you hit it with a mallet.
For a socket chisel, the handle fits into a metal socket. Check that the handle sits snugly in the socket and doesn’t wobble.
Finally, check the cutting edge. Run your thumb gently across the bevel (not the edge itself) to feel for nicks or dull spots. A quick pass on a sharpening stone or a few strokes on a leather strop can fix small issues before they get worse.
Frequently Asked Questions
Safe chisel use really comes down to your grip, sharpening routine, and paying attention to the wood’s grain. Here are some basics to help you use chisels right and keep them working well.
How do you use a wood chisel safely and correctly?
Keep both hands behind the cutting edge at all times. Your back hand pushes or strikes the chisel, and your front hand guides the blade and controls depth.
Never put your hand or fingers in front of the blade’s path. Clamp down your workpiece so it doesn’t move while you cut.
Always cut away from your body. If the chisel slips, you want it moving away from you, not toward your hand or leg.
What are bevel-edge, mortise, paring, and firmer chisels used for?
Bevel-edge chisels have angled sides, so you can get into tight corners, like cleaning up dovetail joints. They’re good for general shaping and detail work.
Mortise chisels are thick and tough. They’re made for chopping out mortises and can handle heavy mallet blows without bending.
Paring chisels are long and thin, meant for slicing off thin layers of wood by hand, not for striking. They’re great for fine trimming and smoothing flat spots.
Firmer chisels have a flat, rectangular cross-section without beveled sides. They’re sturdy and work well for general cutting and light chopping.
How do you sharpen a woodworking chisel and maintain the correct bevel angle?
Most bench chisels use a bevel angle between 25 and 30 degrees. Lower angles give you a sharper edge for delicate work, while higher angles make the edge stronger for tougher jobs.
Start on a coarse sharpening stone to fix nicks or reshape the bevel. Move to finer stones to polish the edge and get rid of scratches.
If you’re not sure you can keep a steady angle by hand, use a honing guide. Try to keep the angle the same with every stroke so you don’t round over the edge.
Finish by stropping the blade on leather with a bit of polishing compound. This gets rid of the tiny wire edge left behind and makes the blade razor sharp.
Which direction should a chisel face when cutting with or against the wood grain?
Always try to cut with the grain. Look at the wood to see which way the fibers run, and angle your chisel to follow that direction.
Cutting with the grain gives you smoother, cleaner results. If you cut against the grain, the wood can tear, split, or chip in ways you don’t want.
Grain direction can change, especially in curved or figured wood. Keep an eye on the pattern and adjust your angle as needed.
How can a chisel be used to trim joints and make fine-fitting adjustments?
Chisels let you shave off just a bit of wood to make joints fit tightly. You’ll often do this when adjusting dovetails, mortise-and-tenon joints, or dado slots.
Use light, careful paring cuts instead of heavy strikes when you’re fine-tuning a fit. Take off thin slices and test the joint often so you don’t go too far.
For flat spots, hold the chisel bevel-side down and use a low angle to skim off high areas. In corners and tight places, a bevel-edge chisel helps you reach without gouging the wood around it.
What are the best ways to store, clean, and protect woodworking chisels?
Store chisels so the edges don’t touch other tools. A wall-mounted rack, tool roll, or just some simple blade guards will help prevent chipping.
After using them, wipe the blades dry to keep rust at bay, especially if your shop gets humid. I usually add a light coat of oil before putting them away, just for some extra protection.
Try to keep handles out of extreme heat or moisture, since wood and plastic can crack or warp. Every now and then, give your chisels a once-over for rust spots or dull edges so you can fix small issues before they become a headache.