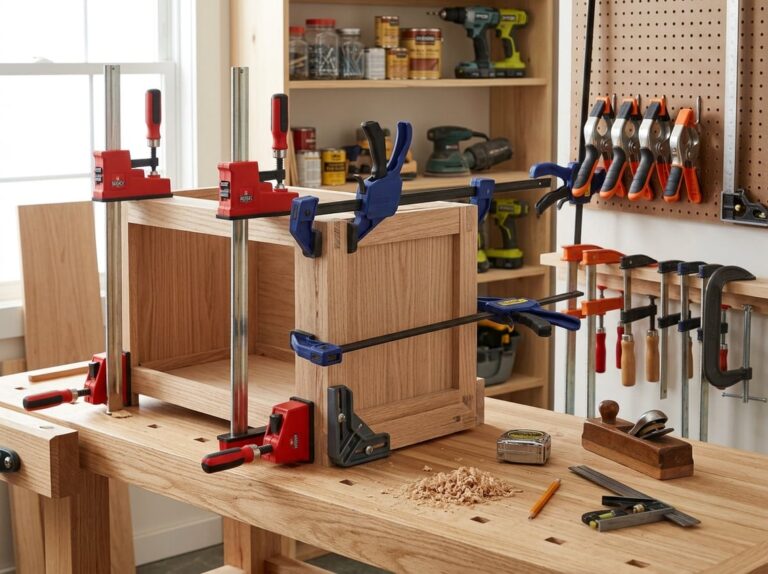
Clamps keep your wood steady while glue dries or as you fit parts together. If you don’t have the right clamp, joints can shift, glue lines might open up, and hours of effort can unravel in a snap. It’s all about picking the clamp that fits the job: bar clamps for long glue-ups, F-clamps for general assembly, spring clamps for those quick holds, and parallel clamps when you need flat, even pressure.
Every woodworking project asks something different from your clamps. Gluing up a tiny box? That needs a different grip than a big, wide tabletop. When you build up a decent clamp collection, you’ve always got the right tool nearby, rather than forcing a clamp to do something it was never meant for.
This guide digs into how to choose and use woodworking clamps in a way that actually works. You’ll get a sense for how much pressure to use, how to keep boards from bowing, and how to avoid leaving marks or dents on your wood. There are also some tips for storing clamps and a few little tricks that make glue-ups less stressful.
Choose the Right Clamp for the Job
No single clamp covers every task in the shop. Once you match the clamp style to your project’s size, shape, and pressure needs, your glue-ups and assemblies just go smoother.
Bar Clamps and F-Clamps for Everyday Work
Bar clamps and F-clamps, sometimes called F-style clamps, do most of the heavy lifting in a shop. They have a fixed jaw on one end and a sliding jaw that moves along a metal bar, so you can quickly fit them to different board widths.
You tighten these clamps with a screw at the head, which gives you steady, controlled pressure. Bessey and Jorgensen are the big names here, and their clamps can take a beating.
You’ll probably use these most for edge gluing, frame assembly, and general joinery. Get a few in different sizes, from 12 inches up to 48 inches, so you aren’t stuck improvising when you need a longer reach.
Parallel-Jaw Clamps for Flat, Square Assemblies
Parallel clamps, or parallel jaw clamps, keep both jaws flat against your workpiece at the same time. This stops the twisting and bowing that can happen with regular bar clamps when you tighten them unevenly.
They’re especially handy for wide panel glue-ups, cabinets, and tabletops where flat, square results matter. The wide jaw faces spread out the pressure, so you don’t get gaps.
They cost more than basic bar clamps, but the accuracy is worth it for big projects. If you build furniture often, four to six parallel clamps will cover most glue-ups you’ll run into.
Pipe Clamps for Long and Wide Glue-Ups
Pipe clamps are a cheaper way to handle long or wide glue-ups without buying a bunch of pricey bar clamps. You buy the clamp fixtures and thread them onto black iron pipe cut to whatever length you need.
This setup means you can make clamps as long as you want, just by swapping out the pipe. Most home shops get by with ¾-inch or ½-inch pipe.
One end tightens with a screw, and the other has a fixed stop that slides along the pipe. Pipe clamps are great for tabletops, doors, or any panel that’s too wide for your bar clamps.
Spring and Trigger Clamps for Fast, Light Holding
Spring clamps and trigger clamps (sometimes called quick-grip or pistol-grip clamps) are all about speed. Squeeze the handle, drop them in place, and let go for instant pressure.
They don’t give you as much force as a screw clamp, so stick to light-duty stuff. You’ll see people use them for:
- Holding jigs or templates in place
- Securing small parts while routing
- Tacking down cauls or backer boards
- Quick clamping during test fits
Trigger clamps work one-handed, which is a lifesaver when your other hand’s busy holding a workpiece. Keep a few of each type on your bench for quick jobs that don’t need a ton of pressure.
Corner, Band, and Other Specialty Clamps
Some projects just need a clamp shape you can’t get from the basics. Corner clamps hold two pieces at 90 degrees, so they’re perfect for picture frames, boxes, and small cabinet doors.
Band clamps (or strap clamps) wrap around weird or multi-sided shapes like chair frames, octagons, or tapered legs. You tighten the strap with a ratchet or screw until it pulls even pressure all around.
C-clamps, sometimes called G-clamps, use a classic screw design. They’re solid for metalwork and small woodworking when you need a compact, strong grip. It’s worth keeping a couple specialty clamps around for those odd jobs your regular clamps can’t handle.
Match Clamp Size, Reach, and Force to the Workpiece
Before you buy any clamp, think about what you’ll actually build with it. The right clamp depends on three things: how wide your workpiece is, how far the clamp needs to reach, and how much force it can apply without chewing up your wood.
Opening Capacity and Jaw Opening
Clamping capacity just means the widest gap a clamp can span. If your panel or frame is wider than that, the clamp’s useless for the job.
For small boxes and frames, a jaw opening of 300-600 mm should be enough. Tabletops and bigger glue-ups need clamps rated for 800-1200 mm or more.
Buy clamps with a little extra capacity, not just what you need right now. That way, you aren’t buying new ones every time a project gets a bit bigger.
Throat Depth and Clamp Access
Throat depth is how far from the bar to the clamping point. It tells you how deep into a panel you can reach.
If the throat is shallow, you can only clamp near the edges. That can be a problem on wide panels, where the center might bow up if you can’t clamp it.
Deep-throat clamps, like some F-clamps, let you reach further in. That helps you put pressure where you actually need it, not just along the edges.
Clamping Force Without Crushing Wood
Clamping force is just how much pressure the clamp puts on the wood. Too little, and you get gaps in the joint. Too much, and you might crush the wood or squeeze out all the glue, which weakens the joint.
Use just enough pressure to pull the joint together and see a thin, even bead of glue squeeze out. If you see the wood dent or the jaws bite in, that’s too much.
Tips for controlling clamp pressure:
- Tighten clamps in small steps, not all at once
- Check for square before you crank down
- Put clamp pads or wood cauls between the jaws and your project to spread out the pressure
- Don’t over-tighten bar clamps, since they can apply more force than you think
Build a Useful Beginner Clamp Collection
A good clamp collection covers different sizes and types, so you’re ready for most projects. You don’t need every style right away, but a few basics will handle almost anything.
A good starter set includes:
| Clamp Type | Best For | Typical Size Range |
|---|---|---|
| Bar clamps | Wide panels, tabletops | 600-1200 mm |
| F-clamps | Deep reach, general assembly | 300-600 mm |
| Spring clamps | Quick holds, light pressure | Small, fixed capacity |
| Parallel clamps | Even pressure, flat glue-ups | 300-1000+ mm |
Start with two or three bar clamps and a handful of spring clamps. Add parallel clamps when you start gluing up bigger panels, since they spread pressure more evenly across the joint.
Plan a Glue-Up Before Applying Wood Glue
If you rush a glue-up, you end up with crooked joints, uneven pressure, and wasted wood. Before you even open the glue, check your fits, set up your clamps, and have your supplies ready so the glue-up doesn’t turn into a scramble.
Dry-Fit Every Assembly First
Always dry fit your project before adding glue. Clamp the whole thing together without glue to check for gaps, misalignment, or parts that don’t sit flush.
Time yourself during the dry fit. That way, you know if you can finish before the glue starts to set.
Check each joint by hand. You shouldn’t need a ton of force or a mallet to bring parts together.
If a joint needs force to close, fix it before gluing. Clamps can pull things into place, but they can’t fix a bad cut. Forcing a poor fit usually leads to glue joints failing down the road.
Lay Out Clamps for Even Pressure
Good clamp placement keeps your panel flat and your joints tight. For panel glue-ups, space bar or pipe clamps about 10 inches apart along the joint.
Alternate clamps above and below the panel to balance pressure and keep the panel from bowing as it dries.
For wide panels, use extra clamps across the width, not just along the seams, to spread out the pressure.
Check for square before you tighten everything down. Measure both diagonals; if they match, you’re square. If not, tweak your clamp positions or pressure until they do.
Prepare Cauls, Pads, and Cleanup Supplies
Set out cauls, clamp pads, and cleanup tools before you start gluing. Cauls are just flat, stiff boards you put across a panel to spread pressure and keep boards from sliding.
A slightly bowed caul works best. As you tighten clamps, the caul flattens and pushes even pressure across the panel.
Put clamp pads or scrap wood between the jaws and your project to protect the surface from dents.
Keep a damp rag, a plastic putty knife, and some wax paper handy. These help you clean up glue squeeze-out before it dries and scrape off excess without messing up your wood.
A light coat of paste wax on cauls and clamp faces keeps glue from sticking where you don’t want it.
Work Within the Open Time of the Glue
Wood glue only gives you so much time before it starts to set up. Usually, you get about 5 to 10 minutes with standard glue, maybe up to 20 or 25 with the extended stuff.
When you dry-fit everything, pay attention to how long it takes. If you realize the glue-up will drag on, just break it into smaller chunks and tackle them one at a time.
If you’re dealing with a big or awkward assembly, ask someone to help out. Having another set of hands for glue and clamps keeps things moving and stops pieces from locking up before you’re done.
Clamp Panels, Frames, and Cases Without Distortion
Getting flat panels and square corners is mostly about how you place your clamps, not how tight you crank them. Each project needs its own approach to stay square while the glue dries.
Keep Panel Glue-Ups Flat and Prevent Bowing
Panels can bow if the clamps pull boards up or down instead of straight together. This pops up a lot with wide glue-ups like tabletops, where uneven pressure twists the wood.
To fight this, alternate your bar clamps above and below the panel. Put one on top, then the next underneath, and keep going down the line.
Set the panel up on risers so glue and clamps don’t mess up your bench. Cauls across the ends help keep boards flush and stop them from sliding around as you tighten things up.
Before the glue cures, grab a straightedge and check the panel. Fixing little problems now is way easier than flattening a warped panel later.
Clamp Mitered Corners and Picture Frames
Mitered corners like to slip apart under pressure since the glue surface is angled. That makes picture frames and similar projects a pain without the right clamps.
Corner clamps hold two frame pieces together at a fixed 90-degree angle, so you can glue one corner at a time without things sliding around. For putting the whole frame together, a band clamp is the way to go. It wraps around all four sides and pulls everything tight in one shot.
With a band clamp, add a corner block or scrap wood at each miter. That spreads out the pressure and keeps the corners from getting dented.
Tighten the clamp slowly and check both diagonals with a tape. If they match, the frame’s square.
Keep Boxes and Cabinets Square During Assembly
Racking is a big problem when you’re putting together boxes or cabinets. One side can slip out of square before you get the clamps tight.
Dry-fit the whole case before adding glue. That way, you spot any joint issues before they’re permanent.
When you start clamping, go diagonally across corners to check for square. If one diagonal is longer, shift a clamp toward that side and pull it back in line.
For deep cabinets, use clamp fixtures or squaring braces to hold panels while you work. These let you move your bar clamps around without the whole case falling apart.
Always clamp both the front and back edges. If you only clamp one side, you’ll pull the case out of square.
Use Clamps for Face Frames, Doors, and Pocket-Hole Work
Face frames need even pressure at every joint. If you clamp unevenly, you’ll end up with gaps that show later.
For pocket holes, grab a cabinet clamp or face clamp to keep pieces flush while you drive screws. That stops boards from shifting sideways as the screw pulls them together.
Door frames need square corners, just like picture frames. Use corner clamps at every joint and check the diagonals before the glue sets up.
When you glue panels into cabinet doors, don’t go overboard on clamping. Too much pressure bows the frame and the door won’t sit flat when you hang it.
Use Enough Pressure Without Starving the Joint
If you don’t clamp tight enough, you’ll get gaps. If you clamp too hard, you’ll squeeze out most of the glue and weaken the joint. You want enough pressure to close the joint and leave a thin, strong layer of glue inside.
What Proper Glue-Line Pressure Looks Like
Wood glue just needs solid contact, not brute force. Tighten the clamp until the joint closes and you see a thin bead of glue squeeze out. That means the glue is spreading and the wood is making full contact.
No need to crank the handle with all your strength. Most bar clamps and parallel clamps only need moderate hand pressure for a solid bond. If you overdo it, you can bow thin panels or crush soft woods like pine.
If you see a wet line of glue at the seam after clamping, you’re good. If it looks dry with no squeeze-out, you probably need more glue or a bit more pressure.
Recognize and Control Glue Squeeze-Out
Some squeeze-out is normal. It shows you’ve got enough glue and even pressure. If glue pools or drips everywhere, you’ve probably clamped too hard and pushed most of it out.
A thin, steady bead is perfect. If you get big puddles, back off the clamps a little. That keeps enough glue in the joint for strength.
Wipe away extra glue with a damp cloth right after clamping, especially on open-grain woods like oak. For tight-grain woods like maple, let the glue firm up first, then scrape it off with a putty knife. That way, you don’t push wet glue deeper into the grain and mess up your finish later.
Balance Clamps Above and Below the Work
If you just put clamps on one side of a panel, you’ll probably end up with bowing. Alternating clamps above and below the workpiece keeps pressure balanced and the boards flat.
Try placing one bar clamp on top, then the next underneath, and space them evenly along the length. This spreads out the pressure and helps resist racking, where things shift out of square. Balanced clamp placement keeps joints tight from edge to edge, not just at the clamp spots.
Check Alignment Before the Glue Sets
After you clamp everything, check the alignment right away. Glue makes the surface slippery, so parts can still shift even if you think you’ve got them locked down.
Light clamps or spring clamps help hold things in place while you make adjustments. Get everything lined up, then add your main clamps and tighten them up.
Check for square with a diagonal measurement or a square tool. If it’s off, loosen the clamps a bit, move the parts, and retighten. Do this before the glue starts to set, since you only get a short window to fix things.
Protect the Workpiece and Use Clamps Safely
Metal clamp jaws can dent wood and leave stains, so always put something between the clamp and the surface. Clamps do more than just hold glue joints—they keep your workpiece steady during cuts, drilling, or sanding, which protects both the wood and your hands.
Prevent Clamp Marks and Metal Staining
Bar clamps, C-clamps, and pipe clamps can dent soft wood or crush fibers if the metal touches the surface.
Black iron pipe in pipe clamps is notorious for leaving dark stains when glue or water gets on it. The iron reacts with moisture and the tannins in the wood.
Try these tricks:
- Clamp pads, like rubber or plastic covers for the jaws
- Cauls, which are just scrap wood strips between the clamp and your project
- Wax barrier, a light coat of paste wax on the pipe or jaw where it touches the wood
Cauls also help spread pressure over a bigger area, so you don’t crush a narrow spot on the wood.
Secure Work Safely for Cutting, Drilling, and Sanding
A loose workpiece is just asking for trouble with power tools. Clamp your material to the bench before using a table saw, jointer, drill, or sander.
For table saw work, only clamp pieces that stay away from the blade path—never clamp a piece you’re feeding through the saw. Use clamps for jigs, featherboards, or stop blocks instead.
When drilling, clamp the piece flat so it can’t spin or shift if the bit catches. That saves your fingers and keeps holes straight.
During sanding, a clamped workpiece won’t slide around, so you get better control and a smoother result. Just make sure clamps are out of the way so you don’t run into them with your tool.
Remove Clamps at the Right Time
If you take clamps off too soon, the joint can shift or open up, which weakens it.
Most wood glue sets up enough to handle in 30 to 60 minutes at room temperature. Wait at least that long before pulling the clamps, and give it more time if it’s cold or humid.
When you do remove them, loosen clamps slowly and evenly. That prevents sudden pressure changes that could crack a fresh glue line, especially on big panels with lots of clamps.
Check the joint for square or flatness right after you pull the clamps. Sometimes you can still make small tweaks before the glue fully cures.
Maintain, Store, and Expand Your Clamp Collection
Clean clamps just work better and last longer. Store them right, and you’ll find what you need fast instead of digging through a pile.
Clean Glue and Keep Screw Mechanisms Moving
Wipe off dried glue after every use. If glue builds up on the jaws, clamps don’t grip well and can mark your workpiece.
Use a chisel or putty knife to scrape off hardened glue from the bars and jaws. For the screw, add a few drops of paraffin wax or dry lube once a month.
Don’t use oil-based lubricants on wood clamps. Oil can get on your project and mess up a glue joint or finish.
Check these spots regularly:
- Screw threads – keep them clean and lubricated
- Jaw pads – replace if cracked or worn
- Sliding rails – wipe them down for smooth movement
- Bar surfaces – scrape off glue after each use
Clamps that move easily save you time on every project.
Store Clamps for Fast Access
Group clamps by type and size. Bar clamps, F-clamps, spring clamps, and parallel clamps all need something a little different for storage.
Wall racks are great for long bar and pipe clamps. Hang them horizontally so the bars stay straight and the jaws don’t bend the metal over time.
Short clamps like spring clamps or small F-clamps fit well in a bin or notched rack near your bench. That way, you can grab what you need during glue-ups without hunting around.
Keep clamps organized by length. It’s just faster to pick the right size for a cabinet or panel glue-up if you’re not sorting through a pile of the wrong ones.
Add Specialty Clamps Only When Projects Require Them
Pick up specialty clamps only when a project actually calls for them, not just because you saw them in a catalog. Band clamps and strap clamps are great for curved assemblies and odd shapes, where regular bar clamps just won’t cut it.
Corner clamps help you square up drawers and picture frames. Face clamps keep miters tight without leaving marks on the wood.
Here’s a quick guide for when to grab those specialty clamps:
| Project Type | Recommended Clamp |
|---|---|
| Curved glue-ups | Band or strap clamp |
| Frame corners | Corner clamp |
| Miter joints | Face clamp |
| Cabinet assembly | Parallel clamp |
Most of the time, a solid set of bar, F, spring, and parallel clamps will get you through. Add the specialty ones as you go, when you hit a project that really needs them.
Beginner Clamping Habits That Prevent Mistakes
Always dry-fit your project before you reach for the glue. It’s a low-stress way to check clamp placement and pressure, and you get to fix problems before things get sticky.
Tighten clamps in stages, swapping sides as you go. This helps keep pressure even and stops your workpiece from creeping out of square.
Put cauls or scrap wood between the clamp jaws and your project. This spreads out the pressure and keeps the wood surface safe from dents.
Start with gentle pressure, then add a little more if you need it. Cranking down too hard bends your work and squeezes out too much glue, which actually weakens the joint.
Frequently Asked Questions
Clamp selection, pressure, and technique can get confusing for beginners. Here are some straight answers to the most common questions.
What types of woodworking clamps are essential for a beginner shop?
Start out with four bar clamps at 24 inches and four at 12 inches. That’ll cover most glue-ups and basic assembly work.
Grab eight spring clamps for light-duty jobs like holding trim or small parts. One band clamp is handy for frames, chairs, and any angled assembly where a bar clamp just won’t fit.
That adds up to 13 clamps. It might sound like a lot, but you’ll be surprised how quickly you use them all during a glue-up.
When should I use bar clamps, F-clamps, parallel clamps, or spring clamps?
Bar clamps and F-clamps are your go-to for general glue-ups, holding wood to your bench, and edge-gluing panels. You’ll probably reach for these most often because they’re so versatile.
Parallel clamps are worth it for cabinet face frames and furniture joints. Their jaws stay flat and even under pressure, so they won’t twist your workpiece like a bar clamp sometimes does.
Spring clamps are for lighter jobs, like holding trim in place or keeping a part steady while you drive a screw. They just don’t have the muscle for structural glue joints, so don’t count on them for anything that needs real strength.
How much clamping pressure is needed for a strong wood glue joint?
Most furniture joints do fine with 100 to 200 pounds of clamping force per clamp. You don’t really have to measure it, though. The glue tells you when you’ve got it right.
Look for a steady, thin bead of glue squeezing out along the joint. If you see that, your pressure and glue amount are good.
Too much pressure pushes out extra glue and can crush wood fibers, especially in softwoods. That actually makes the joint weaker, not stronger. Parallel jaw clamps help here since they apply even pressure without needing a ton of force.
How can I prevent boards from bowing or slipping during a glue-up?
Bowing often comes from too few clamps, boards with all the grain facing the same way, or putting finish on just one face of a panel.
Fix the clamp problem by spacing them every 8 to 12 inches along your panel. Alternate clamps from top to bottom as you go.
For grain, flip the crown of each board up, down, up, down across the panel before you glue. That way, the opposing forces balance out and help keep things flat.
To stop slipping, always do a dry fit first without glue. It lets you spot weak spots or misalignment while it’s still easy to fix.
What is the best way to protect wood surfaces from clamp marks and glue staining?
Use cauls between clamp jaws and your workpiece. Cauls are just straight scraps or MDF strips that spread out pressure and keep the metal jaws from denting your wood.
Cut cauls a bit longer than your glue-up. Rub a little paste wax or candle wax on the caul face before clamping. That keeps glue squeeze-out from sticking the caul to your project.
For glue lines, wipe off the excess with a damp cloth as soon as it squeezes out. If you wait until it dries, cleaning up gets a lot harder and can leave a mark under your finish.
How should woodworking clamps be cleaned, maintained, and stored?
Wipe dried glue off clamp jaws and bars after every use. If the glue is still wet, a damp rag does the trick, but for stubborn dried spots, try using a scraper or an old chisel. Just be careful not to gouge the metal.
Check screw threads and sliding parts for rust or stiffness. I like to use a bit of paste wax or dry lubricant on moving parts, which helps everything glide smoothly and keeps rust at bay.
Hang clamps on a wall rack or pegboard instead of tossing them in a bin. This keeps the jaws straight and makes it way easier to grab the one you want next time.