Every woodworking project starts with one basic question: how do you join two pieces of wood together?
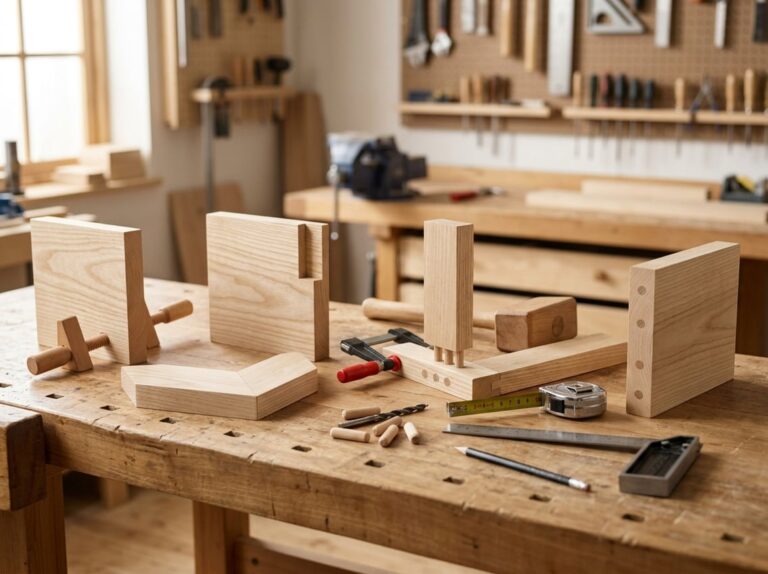
The best beginner wood joints are the butt joint, lap joint, pocket hole joint, and dowel joint, because they need few tools and are easy to learn. If you’re just getting into woodworking, you don’t need fancy skills to make sturdy, nice-looking stuff. Simple wood joints let you focus on the basics before you dive into more complicated techniques.
This guide covers each of these beginner-friendly joints. You’ll see what each joint looks like, when to use it, and why it’s a solid choice when you’re starting out. By the end, you’ll probably have a good idea which joint makes sense for your next project.
How to Choose a Joint That Fits the Job
The right joint depends on how much weight or stress the piece will carry, how the wood grain lines up, and how comfortable you are with certain tools. Putting all these things together helps you pick a joint that looks good and actually lasts.
Match Joint Strength to the Load and Direction of Force
Think about how force will hit the joint before you pick one. A shelf that holds books needs more joint strength than a small picture frame.
Butt joints work fine for light-duty projects, but they struggle under weight or pulling force because they rely only on glue and end grain contact. If your project will have to hold up against weight, twisting, or pulling, a lap joint or pocket hole is a better bet.
Here’s a quick way to match joints to force:
- Downward weight (shelves): dado or lap joint
- Pulling apart (drawers, boxes): box joint or dovetail
- Racking or twisting (chairs, tables): mortise-and-tenon
- Light assembly with screws: pocket hole joint
Pocket holes add real strength for a beginner-friendly technique because the screw does most of the work, not just the glue.
Consider Wood Grain, Surface Contact, and Wood Movement
Grain direction matters a lot for glue strength and how the wood acts over time. Glue bonds best on long grain, where fibers run the length of the board and soak up adhesive evenly. End grain, though, is pretty much like a bundle of straws, so it just drinks up glue without actually bonding well.
This is why a plain butt joint with end grain isn’t very strong. Lap joints and dowel joints fix this by giving you more long grain-to-long grain contact, which gives glue more to grab onto.
Don’t forget about wood movement, either. Wood expands and contracts with humidity, so a joint that locks across the grain can crack as things shift. For panels that need to move a bit, joints like tongue-and-groove or sliding dovetails let things breathe without breaking apart.
Choose Based on Tools, Skill Level, and Visible Appearance
Your tools and experience level narrow down your options fast. Basic wood joinery like butt joints and pocket holes only need a drill, a saw, and a jig, making them realistic for beginners.
Dowel joints need a doweling jig for accurate holes, but you don’t need fancy gear. Lap joints take more precise cuts, usually with a table saw or router, so they might take a bit more practice.
Advanced joinery, like dovetails or mortise-and-tenon, means more setup, tighter tolerances, and usually specialized tools. These joints look great and hold up, but they’re not something you master overnight.
Also, consider if the joint will show. Exposed joints, like through dovetails, add character, while hidden methods like pocket holes or dowels keep things looking clean and simple.
Butt Joints: The Fastest Starting Point
A butt joint is the simplest connection in woodworking, but it needs help to hold up over time. You’ll get better results if you know why glue fails on its own and how to add support with screws, nails, or blocks.
What a Butt Joint Is and Where It Works
You make a butt joint by placing the end or edge of one board flat against another. There’s no cutting or notching, just lining up the two pieces and joining them.
This makes it the easiest corner joint to create, even if you have never built anything before.
You’ll see butt joints in picture frames, face frames, and basic box construction. They also work for tabletops when you join boards edge to edge.
It’s quick to make, but not the strongest. Plan on adding reinforcement if the piece will carry weight or get regular use.
Why Glue Alone Is Weak on End Grain
Wood glue works best on long grain, where the fibers run in the same direction as the board’s length. Long grain surfaces soak up glue and form a strong bond because the glue can grip the fiber structure.
End grain is different. It is made up of the open ends of the wood fibers, like a bundle of straws cut across.
When you put glue on end grain, the glue just disappears into the wood instead of forming a solid layer on the surface. There’s less glue left to actually hold things together.
A butt joint connecting end grain to face grain or end grain to end grain is always weaker than one made with two long grain surfaces. Glue alone isn’t enough for these connections.
Reinforce Butt Joints With Screws, Nails, or Blocks
You can beef up a butt joint in a few simple ways, depending on what you’re making.
- Wood screws: Drill a pilot hole first, then drive the screw through one board into the other. This gives you a strong mechanical connection.
- Nails: Best for lighter projects like picture frames. Nails are fast to use but do not hold as well as screws.
- Corner blocks: Small wood blocks glued and screwed into the inside corner of the joint. These add support without changing the outside look of the piece.
Always pair these methods with glue for the best results. The glue fills small gaps, while screws or nails carry the load.
Lap Joints: Strong Overlaps With Simple Cuts
A lap joint gives you two flat surfaces that overlap and sit flush against each other. This overlap creates more surface contact than a basic butt joint, so wood glue has more area to bond, and the joint holds up better under stress.
Full-Lap and Half-Lap Joint Basics
A full-lap joint is the simplest version. You cut a notch in only one board, and the other board sits inside that notch without any material removed from it.
A half-lap joint is more common and more useful. You remove half the thickness from both boards where they meet. When you fit them together, the two pieces line up flush, and the joint ends up the same thickness as the rest of the wood.
Half-lap joints work well because they don’t add bulk. They also give you a wide gluing surface, which makes the joint stronger than a plain overlap.
| Joint Type | Material Removed | Resulting Thickness |
|---|---|---|
| Full-lap | One board only | Thicker than original board |
| Half-lap | Both boards, half each | Same as original board |
Best Uses for Frames, Aprons, and Workbenches
Lap joints show up often in furniture frames because they hold corners and crossbars in place without extra hardware. You’ll see them used in table aprons, where the joint needs to resist twisting under the weight of a tabletop.
Workbenches also rely on half-lap joints for the base and stretchers. These parts need to stay rigid under heavy use, and the wide surface contact in a half-lap helps prevent wobbling over time.
Because the joint sits flush, it also works well anywhere you want a clean, flat look. This makes it a good choice for shelves, door frames, and small cabinet parts.
Cutting a Lap Joint With Hand Tools or Machines
You can cut a lap joint by hand using a saw to make the shoulder cuts, then a chisel to remove the waste wood between them. This method takes practice, but it gives you full control over the fit.
If you want faster, more consistent results, a table saw works well for cutting the shoulders and clearing out the middle section with repeated passes. A router fitted with a straight bit is another solid option, especially for wider boards, since it removes material evenly and leaves a flat bottom.
Whatever method you pick, check the fit before adding glue. A snug, flat joint will hold better and look cleaner once assembled.
Pocket Holes and Dowels for Easy Reinforcement
Pocket holes and dowels both add strength to a joint without needing advanced hand tools. Each method works well for different projects, and knowing when to use them will help your builds hold up over time.
Pocket Hole Joinery for Fast Assembly
A pocket hole joint uses a screw driven at an angle through one board and into another. You need a pocket hole jig to drill the angled hole correctly. The jig guides your drill bit so the hole lines up with a stepped drill bit, creating a clean pocket for the screw to sit in.
This method works well for face frames, kitchen cabinets, and drawer boxes. It’s fast because you skip the clamping and drying time that glue-only joints need.
Use wood screws made for pocket holes, not standard screws. Coarse-thread screws work best in softwood and plywood. Fine-thread screws hold better in hardwood.
Dowel Joints for Hidden Alignment and Strength
A dowel joint uses small wooden pegs, called dowels, to connect two pieces of wood. You drill matching holes in both boards, add wood glue, then insert the dowels to line up the pieces.
Dowel joints work well when you want a clean look with no visible screws or hardware. They’re common in table legs, shelves, and furniture frames where appearance matters.
The dowels also help keep boards aligned during glue-up, which reduces slipping. This makes assembly easier, especially if you’re working alone.
Unlike pocket holes, dowel joints need accurate drilling. If your holes don’t line up, the joint won’t fit together correctly. A doweling jig can help you drill straight, evenly spaced holes.
When Biscuits Are a Better Alignment Aid
A biscuit joint uses small oval-shaped wood pieces, called biscuits, to align and reinforce a joint. You cut matching slots into both boards using a biscuit joiner, then glue a biscuit into each slot before joining the pieces.
Biscuits work best for joining panels, tabletops, or long edges where you need boards to stay flush during glue-up. They don’t add much strength on their own, but they stop boards from sliding out of place while the glue dries.
This makes biscuits a good choice when appearance matters and you don’t want visible screws or dowel pins. They’re not as strong as pocket screws, so they work best for lighter-duty projects instead of load-bearing joints like table legs or cabinet frames.
Dados and Rabbets for Shelves, Cabinets, and Drawers
Dados and rabbets are two joints that add more strength to your projects than a basic butt joint. You cut both into a board to create a slot or notch that holds a matching piece in place.
Use Dados to Support Shelves and Dividers
A dado joint is a square-sided groove cut across the grain of a board. You use it to hold the end of a shelf or divider in place inside a cabinet or bookcase.
The slot grips the shelf on three sides, so you get more support than just resting a shelf on a small cleat or fastener.
Cut your dado no deeper than half the thickness of your board. If you go deeper, you weaken the wood around the joint.
You have two dado styles to choose from:
- Through dado, runs the full width of the board and shows on both edges
- Stopped dado, stops short of one or both edges for a cleaner look, but you’ll need to notch the shelf to match
Dados work well for cabinets, bookshelves, and any project where shelves need to carry weight without sagging.
Use Rabbets for Cabinet Backs and Drawer Parts
A rabbet joint is an L-shaped notch cut along the edge or end of a board. You use rabbets to hold cabinet backs, picture frame glass, and shiplap panels in place.
In drawer construction, rabbets let you join the sides to the front and back with more surface contact than a butt joint. This gives you a stronger glue bond, but you’ll still want to add nails or screws for lasting strength.
Keep your rabbet depth to no more than two-thirds of your board’s thickness so you leave enough wood to hold the joint together.
Rabbets also make assembly easier. The notch lines up your parts automatically, so you spend less time adjusting before you glue or fasten them.
Make Clean Grooves With a Table Saw, Router, or Hand Tools
You have several tools to choose from when cutting dados and rabbets, and each one fits different jobs.
A table saw with a dado blade cuts wide, deep grooves in one pass. This works best when you have a bunch of identical cuts to make, though dado blade sets aren’t cheap and take time to set up.
A router gives you more flexibility for one-off cuts or curved edges. Use a straight bit with an edge guide for hand-held cuts, or mount your router in a table for better control on smaller parts. Try to keep each pass to no more than 1/8 inch of material to avoid tear-out.
For fine adjustments or small projects, hand tools give you precise control:
| Tool | Best Use |
|---|---|
| Chisel | Cleaning out corners and stopped cuts |
| Router plane | Flattening the bottom of a dado or rabbet |
Whatever method you go with, test your cut on scrap wood first. It’s a quick way to check the fit before you commit to your actual project piece.
Clean Corner Joints for Small Boxes and Frames
Small boxes and picture frames need corners that look neat and hold their shape. Three joint types cover most of your needs: miters for hidden end grain, box or finger joints for strength, and advanced joints for when you want extra durability or decorative appeal.
Miter Joints for Concealed End Grain
A miter joint connects two pieces cut at matching angles, usually 45 degrees, so no end grain shows on the finished corner.
You need a miter saw to get clean, accurate angles. Even a small error leaves a visible gap at the joint.
This joint works well for picture frames and other light-duty projects. It gives you a smooth, seamless look, but it’s not very strong on its own.
Most builders add glue, nails, or small brackets for support. Without reinforcement, a miter joint can pull apart over time, especially if the wood dries out or shifts.
Box and Finger Joints for Durable Corners
Box joints and finger joints use interlocking square-cut fingers to join two boards at a corner. The fingers increase the glue surface, which makes the joint much stronger than a simple miter.
You can cut these joints with a table saw and a basic jig, even without fancy tools. This makes them a good next step once you’re comfortable with saw work.
These joints show on the outside of the piece, so a lot of woodworkers treat them as a design feature. You’ll often see them on small boxes, drawers, and other projects where visible joinery adds character.
Box joints hold up well under regular use and resist pulling apart better than butt or miter joints.
When to Progress to Dovetails and Mortise-and-Tenon
Once you’re ready for more advanced joinery, dovetail joints and mortise-and-tenon joints offer more strength and a refined look.
Dovetail joints use angled, interlocking pins and tails. They’re a standard choice for drawer construction and fine furniture because they resist being pulled apart, even without glue.
Mortise-and-tenon joints work differently. One piece has a slot (the mortise), and the other has a matching tongue (the tenon) that fits inside it.
This joint is common in bed frames, tables, and other furniture that needs to handle weight and stress over time.
Both joints take more practice and precision than miters or box joints. But if you stick with it, you’ll get long-lasting results and a professional, decorative appearance.
Practice, Assembly, and Common Beginner Mistakes
Good joinery depends on more than picking the right joint. You also need to test your cuts, use glue and fasteners correctly, and check your work for gaps or misalignment before moving forward.
Cut and Test-Fit Joints on Scrap Wood First
Before you cut into your real project material, practice on scrap wood. This lets you check your measurements and see how your tools handle the cut.
Use a table saw for straight, repeatable cuts. A router works well for grooves and dados. If you’re cutting a dowel joint or mortise, a chisel can help clean up the edges.
Dry-fit every joint before adding glue. Press the pieces together without any adhesive and check for tight, even contact. If something doesn’t line up, you can adjust it now instead of after the glue sets.
This step is important for any woodworking plans, since it catches errors early. It also builds confidence for beginner woodworkers who are still learning how their tools cut different types of wood.
Use Clamps, Glue, and Fasteners Correctly
Wood glue creates the strongest bond when you apply it evenly and clamp the pieces while it dries. Spread a thin, even layer on both surfaces. Too much glue just makes a mess and can actually weaken the joint.
Clamps hold pieces in place while the glue cures. Without clamps, joints can shift slightly, which weakens the connection and throws off alignment.
Screws and nails add extra strength, especially for butt joints and lap joints. Pilot holes prevent the wood from splitting when you drive in a screw. For dowel joints, apply glue inside the drilled holes, not just on the dowel itself.
Follow the right order of steps. Clamp first, then drive screws or nails, and let the glue set for the time listed on the label. Rushing this part is a classic mistake in woodworking projects.
Avoid Gaps, Misalignment, and Overcomplicated Joinery
Gaps and misalignment reduce structural integrity and weaken the joint over time. Most gaps come from inaccurate cuts or skipping the dry-fit step. Always check corners with a square before joining pieces.
| Common Mistake | Cause | Fix |
|---|---|---|
| Visible gaps | Uneven cuts | Sand or re-cut for a tight fit |
| Misaligned corners | No dry-fit test | Test-fit before gluing |
| Weak joint | Wrong fastener choice | Match screws or dowels to joint type |
| Split wood | No pilot hole | Drill pilot holes before screws |
Beginners often try advanced joinery techniques before they’re ready. Stick to simple joint selection, like butt joints, pocket holes, or dowels, until you feel confident with basic tools like a hand plane and chisel.
Simple joints, done right, are often stronger and more reliable than complex joints done poorly.
Frequently Asked Questions
Beginners often have questions about which joints to start with, how to build them, and where each one works best. The answers below cover the most common joints, their uses, and simple steps to get started.
What are the easiest wood joints for beginners to learn?
The butt joint, lap joint, and pocket-hole joint are the easiest for beginners. They need basic tools and don’t require precise angled cuts or complex fitting.
You can make these joints with a saw, drill, screws, and wood glue. Most beginners can finish their first project using only these three joints.
What is a butt joint, and when should it be used?
A butt joint is made by placing the end of one board flush against another board without cutting or shaping either piece. It’s the simplest joint to make because it only requires a straight cut.
This joint works well for building frames, boxes, and other projects where extra support like screws or nails will hold the pieces together. On its own, a butt joint has low strength because there’s little surface area for glue to bond.
How do you make a simple half-lap joint?
To make a half-lap joint, mark a line halfway through the thickness of each board where they will overlap. Then cut away that section from both pieces so they fit together flush, forming one flat surface.
Use a saw to cut the sides of the notch, then remove the waste wood with a chisel. Glue the two halves together for extra hold, and clamp them while the glue dries.
This joint works well for tabletops, frames, and other flat connections. It’s a good option when you want a simple joint that’s stronger than a basic butt joint.
When are pocket-hole joints a good choice for woodworking projects?
Pocket-hole joints work well when you need a fast, hidden way to connect two boards at an angle, usually 90 degrees. You drill an angled hole into one board, then drive a screw through it into the second board.
This method is common in cabinet face frames, table aprons, and shelving units. It’s beginner-friendly because a pocket-hole jig guides your drill to the correct angle every time.
How can dowels be used to join two pieces of wood at a 90-degree angle?
To join boards at a 90-degree angle with dowels, drill matching holes into both pieces where they meet. Insert wooden dowels coated with glue into the holes, then press the boards together.
The dowels line up the boards and add strength once the glue dries. This method works well for chair legs, frames, and other furniture parts that need a clean, strong connection without visible screws.
What is the best way to join two pieces of wood lengthwise?
Usually, I go with an edge joint when I need to join boards lengthwise, like making a tabletop from a bunch of narrower boards. Just run some wood glue along the long edges of each board, then clamp them together and let the glue set.
If you want a sturdier joint, you can toss in some biscuits or dowels before clamping. This adds more bonding area and helps keep everything lined up while the glue dries.